This post may contain affiliate links. See our disclosure policy.
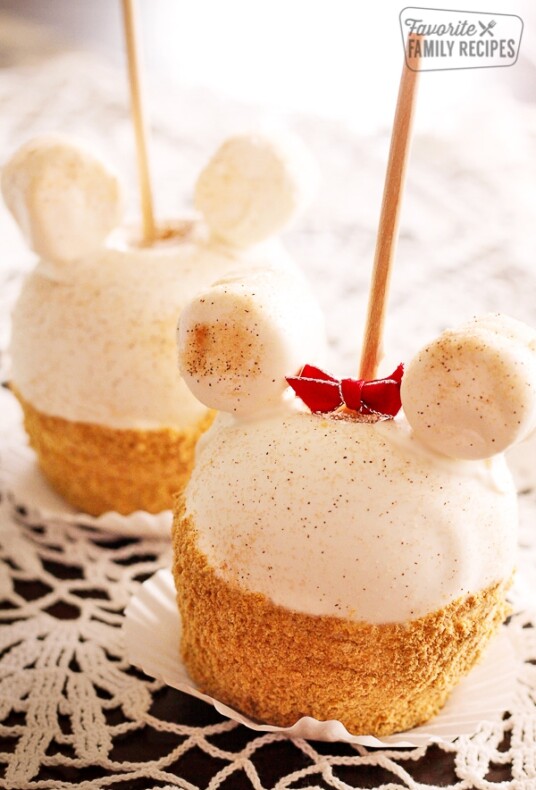
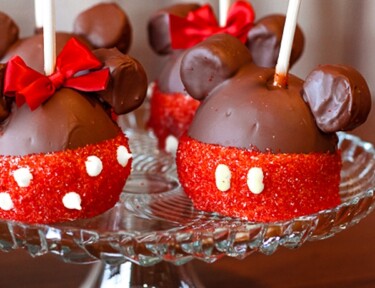
These Mickey & Minnie Caramel Apples are adorable and perfect for a Mickey & Minnie party. Recreate this Disneyland favorite in your own kitchen!

Featured with this recipe
- The Original Recipe
- Ingredients for Disneyland Candy Apples
- Tips for Making the Best Apples with Caramel
- Substitutions and/or Add-Ins Mickey Candy Apples
- Frequently Asked Questions for Candy Apples
- How to Store Candy Apples with Chocolate
- More Fun Disney Parks Recipes
- Mickey and Minnie Caramel Apples Recipe
Aren’t these little Mickey and Minnie Candy Apples adorable?! Whenever we go to a Disney Park, we make it a point to get some kind of candy or caramel apple. And, since we can’t be at Walt Disney World or Disney Land all the time (even though we wish we could) we have found a way to bring the magic home with this recipe!
These candy apples are the perfect way to bring a little of the happiest place on earth to your home. These are so delicious, and with a few steps, can create the best candy apple ever! Once you find these hidden gems located in the magic kingdom or pooh corner, you will always search for them.
The Original Recipe
We found this recipe at GetAwayToday.com and have since become good friends with all the awesome people there. Yes, they are a travel site but they also have a blog where they post fun recipes and travel tips and GIVEAWAYS!!! That is where we originally found this recipe and they graciously agreed to let us share it here on Favorite Family Recipes. We LOVE working with Get Away Today and will continue to bring you great deals through our partnership with them.
P.S. When you go to their site, use the promo code: FAVORITE for an added discount on your next Disney trip from your friends here at Favorite Family Recipes.
Ingredients for Disneyland Candy Apples
Kids love these candy apples and love to help making them! But, with ingredients as easy as this, you can also add in your creative side. When you get done making these, you will want to show them off and put them in a display case!
- Apples – I used green Granny Smith apples. These add that sweet and tart flavor that blend well with caramel and chocolate.
- Apple sticks – This will be stuck in the top of the apple.
- Caramels – Melt your caramels in the microwave or stovetop.
- Wax paper – Lay this flat on a baking sheet for the apples to dry on.
- Marshmallows – Regular size or jumbo marshmallows work well and give the “ears” a great shape.
- Milk chocolate chips- Melt chocolate chips in a bowl in the microwave. Stir in-between 30 second intervals. This will have a smooth and creamy consistency.
- White chocolate chips – These will be divided and used for the buttons on Minnie as well as dipping the apple in.
- Jelly beans – Pick out yellow jelly beans or white colored jelly beans for the buttons on Mickey’s apples.
- Red sanding sugar – Find these near the cakes and bakery isle of your local food stores.
- Red ribbon – Sparkles, sprinkles, or red and white polka dots are fun to make Minnie’s bow out of.
Tips for Making the Best Apples with Caramel
Make the best caramel apples with these simple tips. So, grab a bowl and add your favorite candy-coated chocolate to start melting. Have a fun time making these Minnie and Mickey caramel apples.
- Wash the apples and dry them thoroughly with a towel.
- Twist the apple stem off as close to the base as possible.
- It is best not to use cooking spray on the parchment paper. This will leave an oily finish on the bottom of the apple.
- Use a butter knife to cut the marshmallows for the Minnie mouse marshmallow ears.
Substitutions and/or Add-Ins Mickey Candy Apples
I give you full permission to make your Minnie and Mickey apples just the way you see them! Be creative and add in all the pink ribbon, red melting chocolate, and shiny coating. Create the best Disney apples!
- Instead of red sugar crystals, use pink chocolate with pink melting chocolate for Minnie’s dress.
- Melt your chocolate in a double boiler or saucepan on medium-low heat on the stove instead of in the microwave.
- Place apple on wax paper in-between caramel covering the chocolate.
Frequently Asked Questions for Candy Apples
The most common places to find a Disney apple is at Trolley Treats, Candy Palace, or Main Street Confectionery. On average Mickey and Minnie mouse apples are about $12.99 each in the parks when you checkout.
Refrigerated candy apples can last for up to two weeks before they should be discarded. When ready to eat sit out until the apple is at room temperature.
Craft sticks are best. Find a stick that is strong and sturdy. If you prefer a certain color you can do that too!
Make sure that the apples are clean and dry before dipping in the chocolate. For extra measure you can soak the apples for 15 minutes in a teaspoon of baking soda and two cups of water, then good scrubbing one more time.
In select treats at Disney parks it is known that Werther’s Original caramel is the chosen caramel.
Depending on the flavor and crunch, Jazz apples are great for biting into and hearing the crunch. For a sweet apple and not too tart, Gala apples are the best choice.
Read Next: Our Favorite Foods at Disneyland
How to Store Candy Apples with Chocolate
Place your apple in the refrigerator for three days. Then, wrap each apple in cellophane bag or an air tight container. Because the layers of chocolate and caramel stick to the apples, they will stay together while in the refrigerator, but the apple itself will become brown and gets old.
More Fun Disney Parks Recipes
Love these Disneyland Caramel Apples and want more fun Disney food? Give these other fun Disney treats a try:


Mickey and Minnie Caramel Apples
Ingredients
- 8 Granny Smith apples
- 8 candy apple sticks
- 1 bag caramels
- wax paper
- 16 marshmallows
- 1 bag milk chocolate chips
- 1 bag white chocolate chips – divided
- 4 jelly beans – yellow or white
- 1 cup red sugar crystals
- red ribbon for Minnie’s Bow
Instructions
- Melt the caramels in the microwave.
- Add sticks to the top of each apple, then coat them thoroughly in the melted caramel.
- Place caramel apples on wax paper to set. (Cool completely)
- Use the marshmallows to create your Mouse Ears. Slice a small part of the marshmallow off to expose some of the inside sticky part. Press them onto the caramel apple. Attach them with toothpicks to secure them in place. (Just remember to take the toothpicks out before eating!)
- Melt the milk chocolate chips in the microwave in a microwave safe glass dish. Cook one minute at a time – stirring in between each minute cycle. It should only take about 2 or 3 minutes. Do not over cook the chocolate.
- Now you are ready to dip the apples! Dip them into the warm melted chocolate. Coat the entire apple and ears. You want a good even coating. Give the apple a couple of shakes to get the excess chocolate to drip off. Set on wax paper to cool. Let cool completely.
- Cut some red bows ahead of time out of red ribbon and while the chocolate is still semi-warm, press the bows onto the top of the Minnie apples.
- While the apples are cooling, gather the red sugar crystals, yellow jellybeans (for Mickey’s buttons) and white chocolate chips (for Minnie’s polka dots).
- Melt the white chocolate chips (except the ones reserved for polka dots) the same way as the milk chocolate. Dip the apples only half way up into the warm white chocolate.
- Attach the jellybeans (Mickey’s buttons) onto the white chocolate (it will act as your “glue”) and then completely coat the white chocolate with red sugar crystals. Follow this same process for your white chocolate chips (Minnie’s polka dots) and fully coat with red sugar. Transfer to wax paper and let cool completely.
Notes
Recipe Tips:
- Wash the apples and dry them thoroughly with a towel.
- Twist the apple stem off as close to the base as possible.
- It is best not to use cooking spray on the parchment paper. This will leave an oily finish on the bottom of the apple.
- Use a butter knife to cut the marshmallows for the Minnie mouse marshmallow ears.
- Mix it up! Instead of red sugar crystals, use pink chocolate with pink melting chocolate for Minnie’s dress.
- Melt your chocolate in a double boiler or saucepan on medium-low heat on the stove instead of in the microwave.
- Place apple on wax paper in-between caramel covering the chocolate.
- To store, place your apple in the refrigerator for three days. Wrap each apple in cellophane bag or an air tight container.
Making these would be such a cool idea for a kid’s birthday party. I can only imagine what will come out in the end when a bunch of kiddos are gathered for such a fun project! Thank you for sharing!
Too cute oh my goodness! Great for a themed party or a special treat for the kids. Can’t wait to give it a try!!
How fun are these?! These are perfect for apple season! My kids are going to go crazy for them!
Oh my STARS!
These are adorable and I think I could manage to make them!