We may earn a commission when you click on the affiliate links in this post.
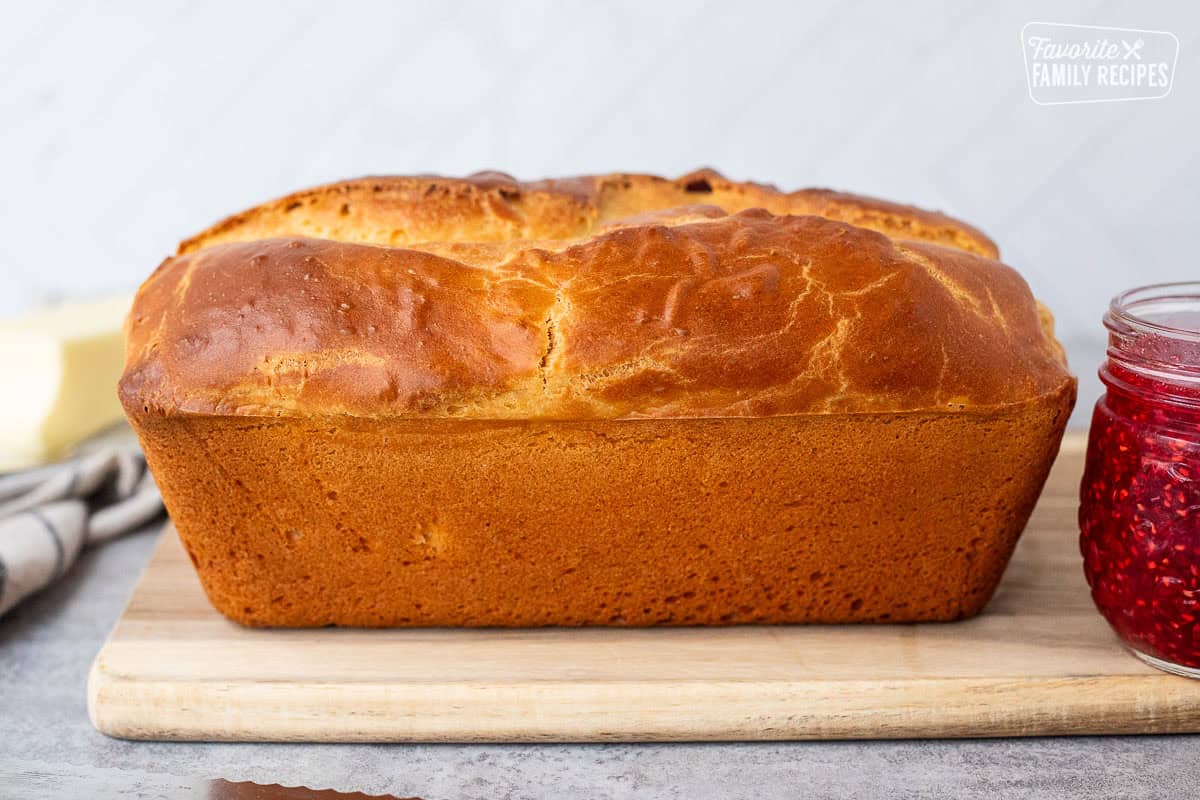
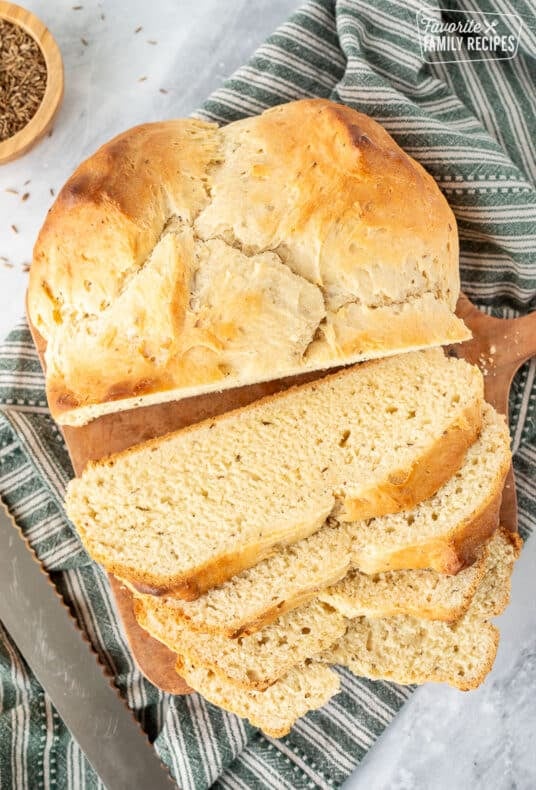
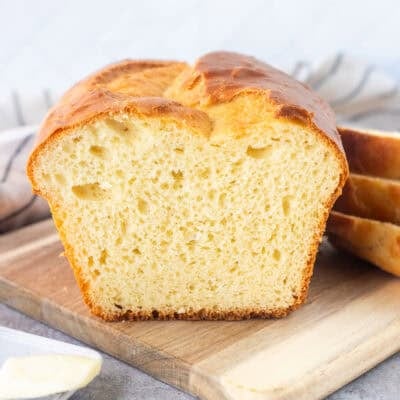
This Sally Lunn bread recipe comes to us from my great-grandmother. This sweet bread is a family favorite, passed down through generations, and is always warm, sweet, and satisfying.

This Sally Lunn bread is a sweet and savory bread that comes together quickly and easily with a few special tricks in the dough. This is a bread dough that you do not need to knead on your countertop. It is sweet, easy, and tastes absolutely delicious with herbed butter and homemade jam!
It is the perfect bread that can be made in less time and still have the texture and flavor that we all love to eat. This bread is special from the start to the end! You will love how fun this is to make, and will see the difference between Sally Lunn bread and other homemade bread alike.
❤️ Erica
Table of Contents
What is Sally Lunn Bread?
A Sally Lunn-type bread is a sweet bread similar to a brioche or a teacake. This recipe goes back centuries, to the 1700s when it is believed to have originated in the spa town of Bath in southwest England. However, details surrounding how it came to be are a bit unknown. One theory is that this recipe got its name from the title “Soleil et lune” which is French for “sun and moon”, representing the golden crust and fluffy white interior of the bread.
The Sally Lunn Eating House in Bath, England claims the recipe was brought to the region in the late 1600s by a refugee named Solange Luyon, who became known as Sally Lunn. We aren’t sure which theory to believe, but we know this: Sally Lunn bread is scrumptious and we love it!
Ingredients
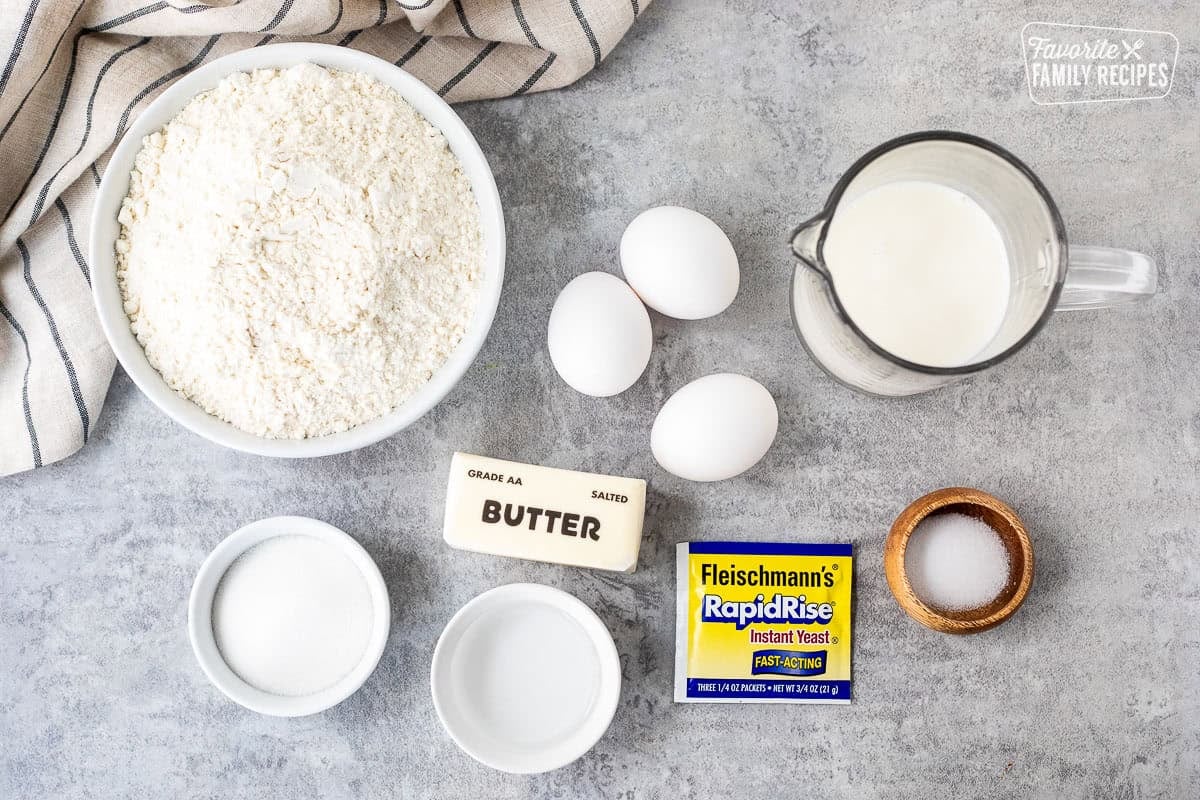
- Hot milk – It sounds different, but this recipe calls for warming the milk to about 120 degrees Fahrenheit. Place your liquid measuring cup in the microwave or heat on the stovetop until warm enough. You can use a meat or candy thermometer to check the temperature.
- Butter – Melt the butter before combining with the hot milk, sugar, and salt.
- Sugar – Added in for sweetness and will be melted together in the liquid milk mixture.
- Salt – This helps the bread rise and gives it structure and blends the flavors together.
- Dry yeast – Use active dry yeast to help this Sally Lunn bread rise.
- Warm water – Mix this with the yeast to help activate the bread dough.
- Eggs – Eggs are a great agent that helps the dough rise and helps soak in the liquid, giving it that spongy texture.
- White flour – Bread needs flour in order to stretch the dough and add it for thickness.
How to Make Sally Lunn Bread
No need to knead this bread! It’s so easy to make. All you do is stir together ingredients, let it rise, then bake!
Step by Step Instructions

- Combine hot milk, butter, sugar, and salt in a large mixing bowl (preferably in a stand mixer). Let cool until lukewarm.
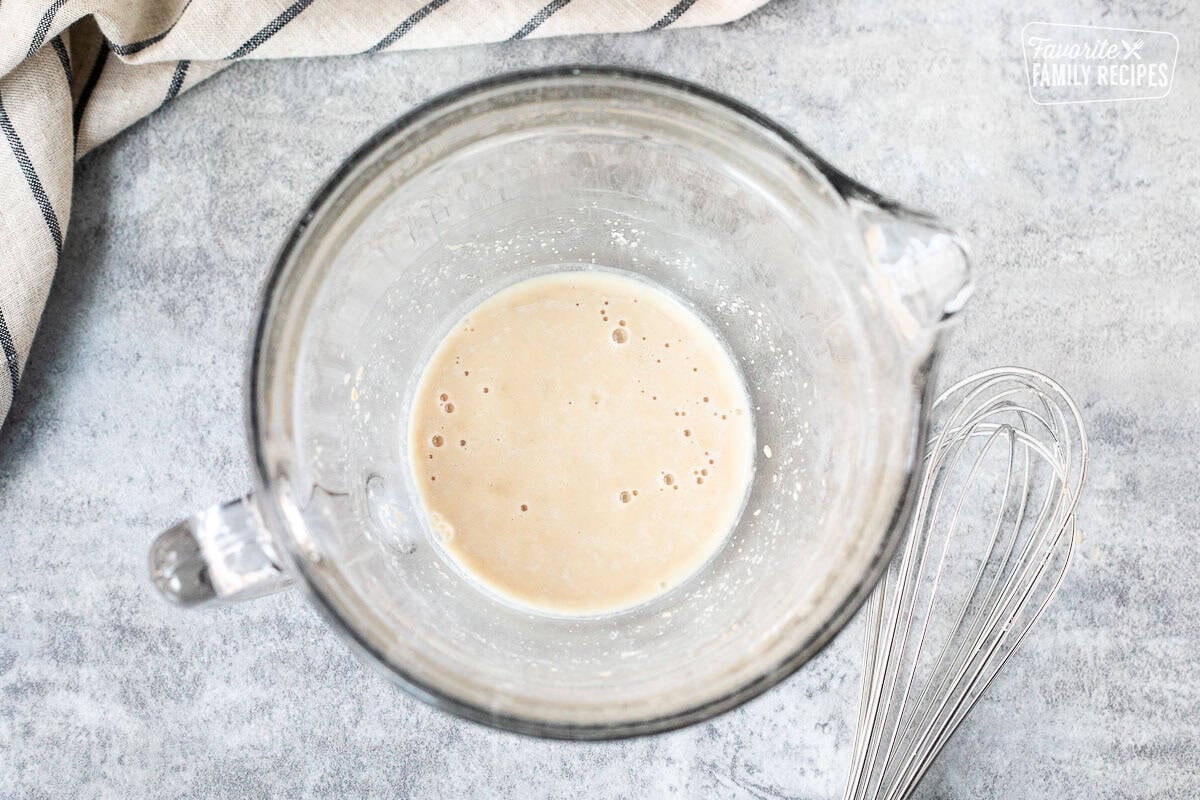
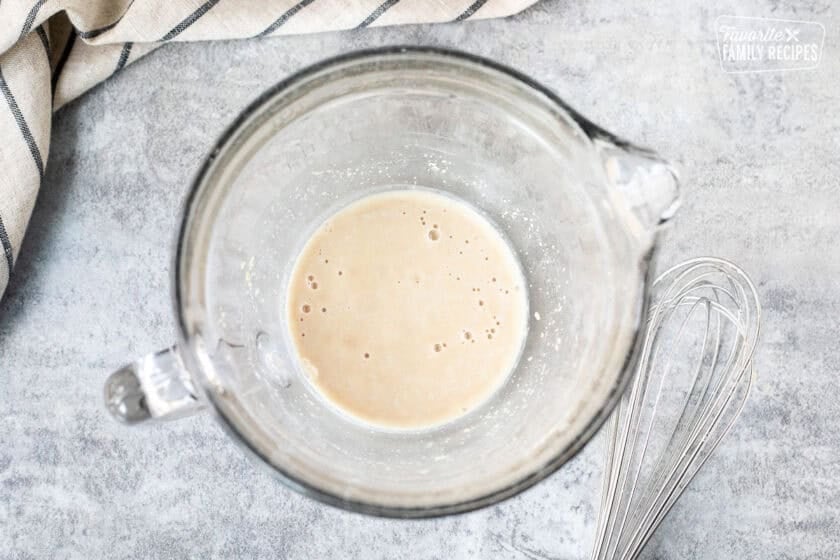
- In a separate bowl, whisk the yeast and warm water together. Let it stand for 5 minutes to dissolve. It will get a little frothy.

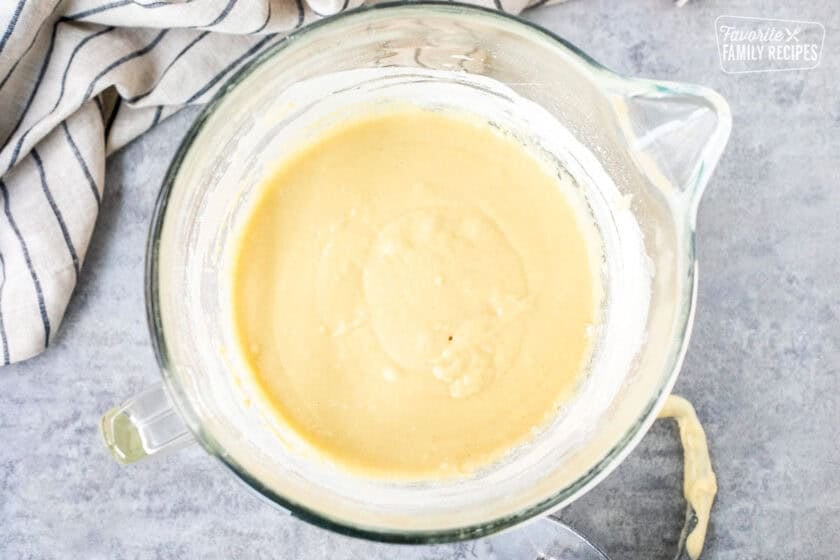
- Add the yeast mixture along with the 3 eggs to the first bowl with the hot milk mixture and beat vigorously.

- Using a hook attachment on the stand mixer, gradually add the flour and mix for 3 minutes.
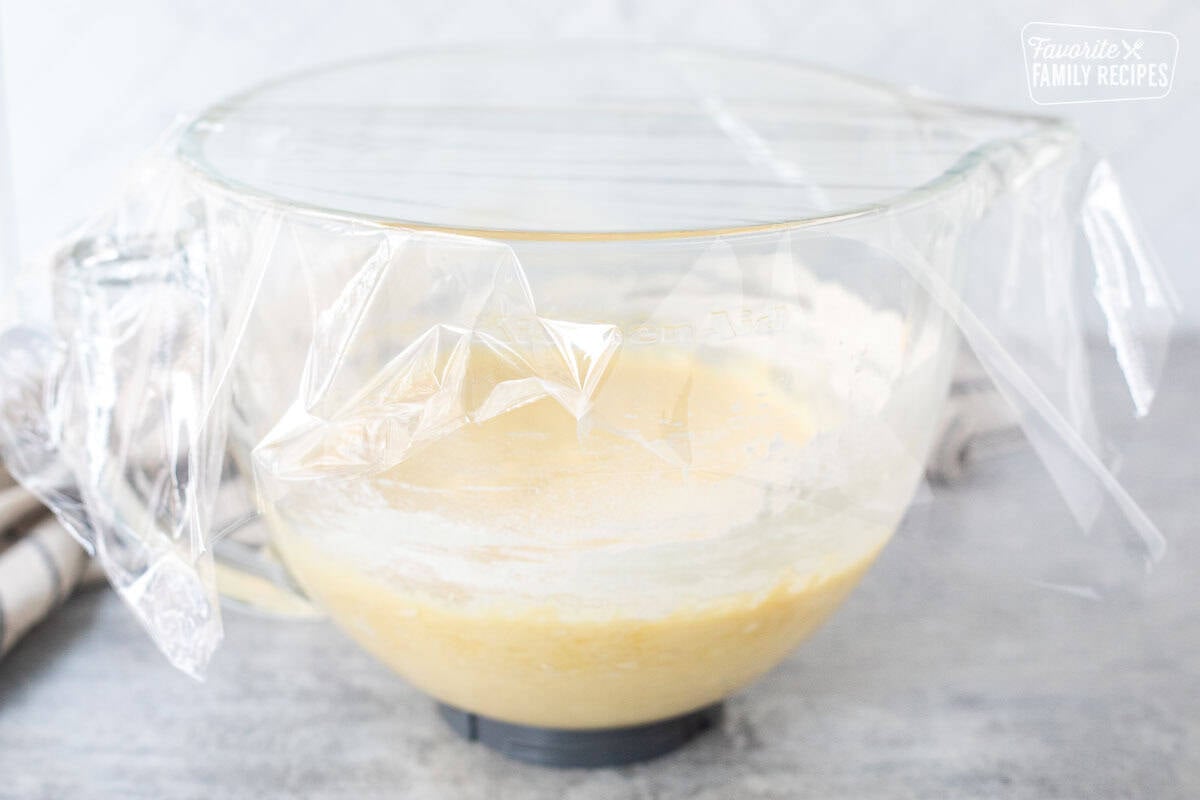
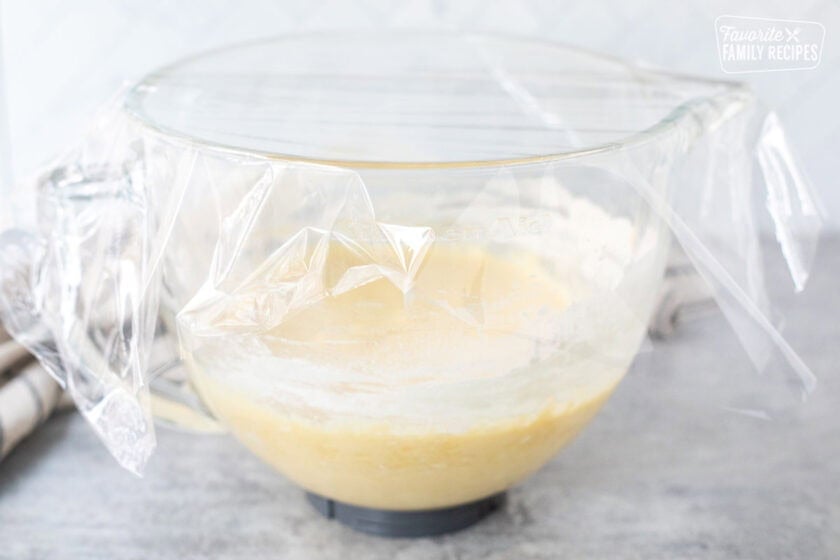
- Cover the bowl loosely with plastic wrap.
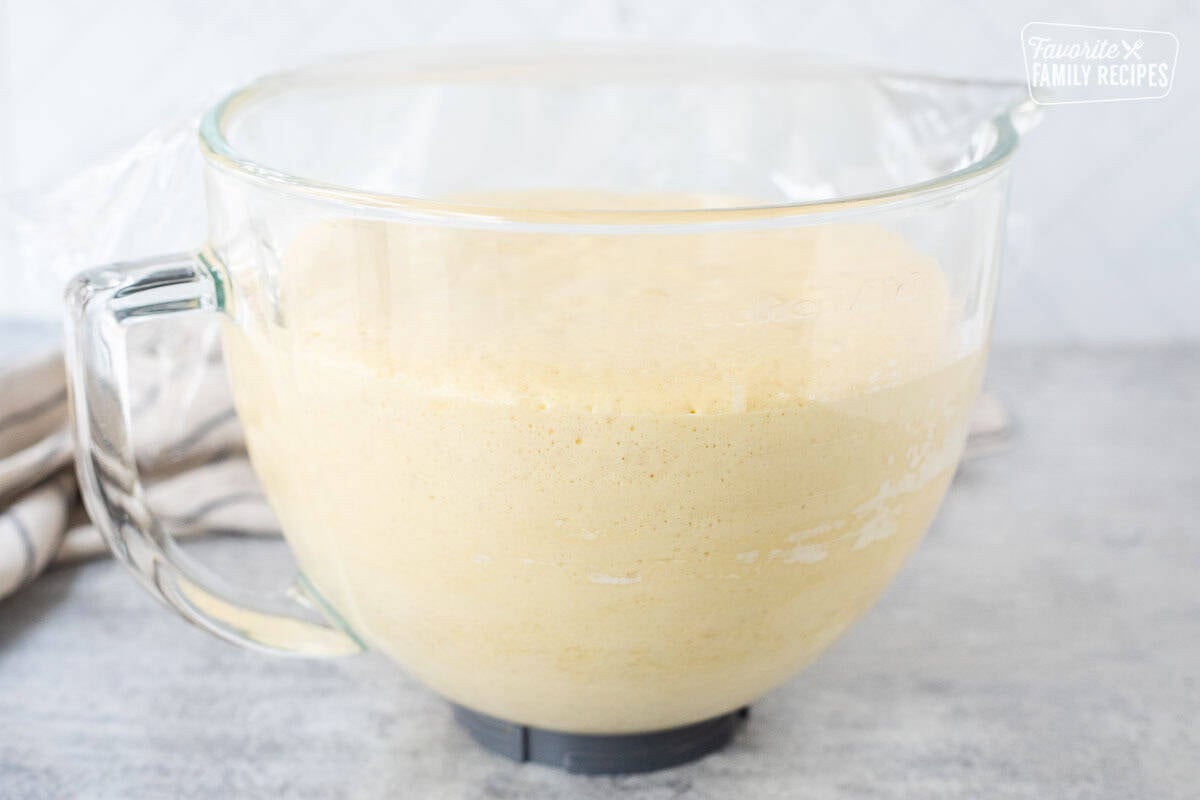
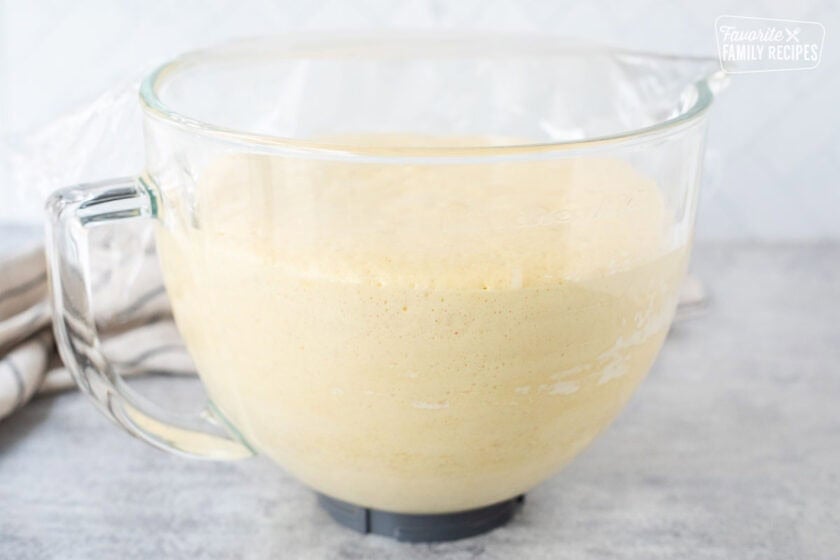
- Let the dough rise is a warm place until doubled. This should take about 1 hour. While the dough is rising, preheat oven to 350°F.
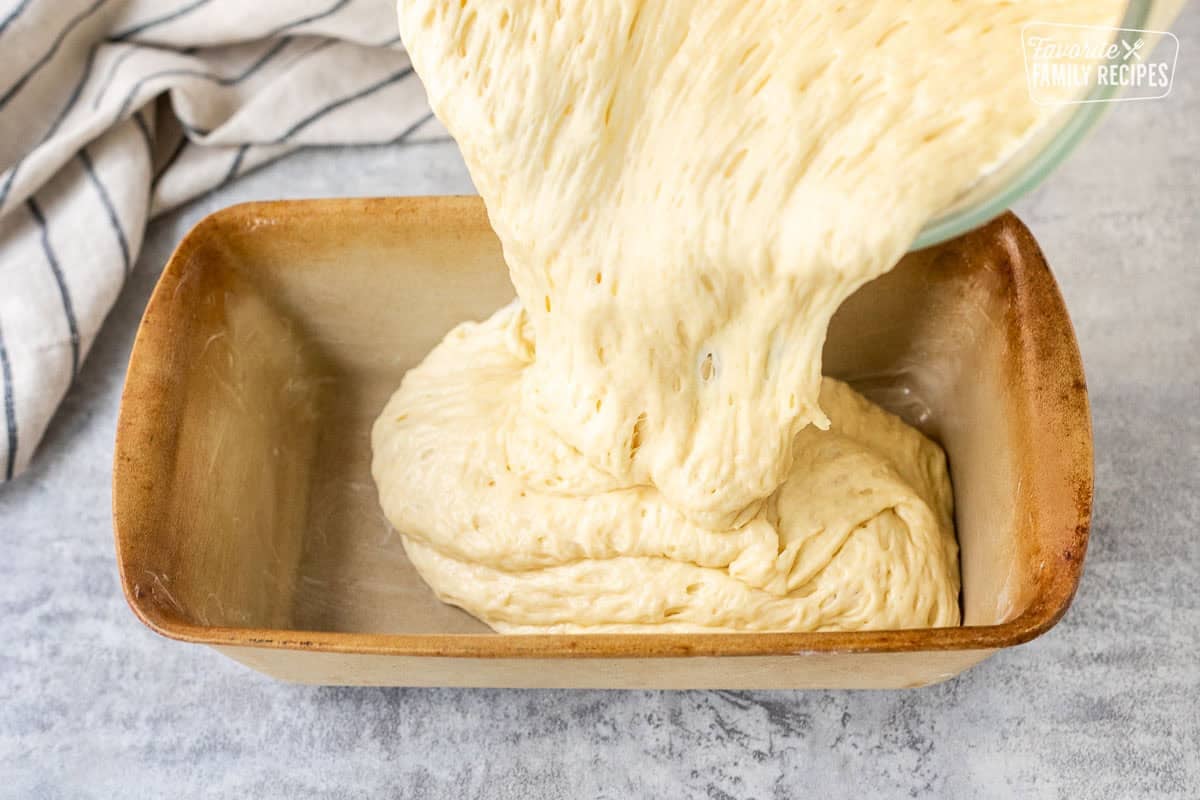
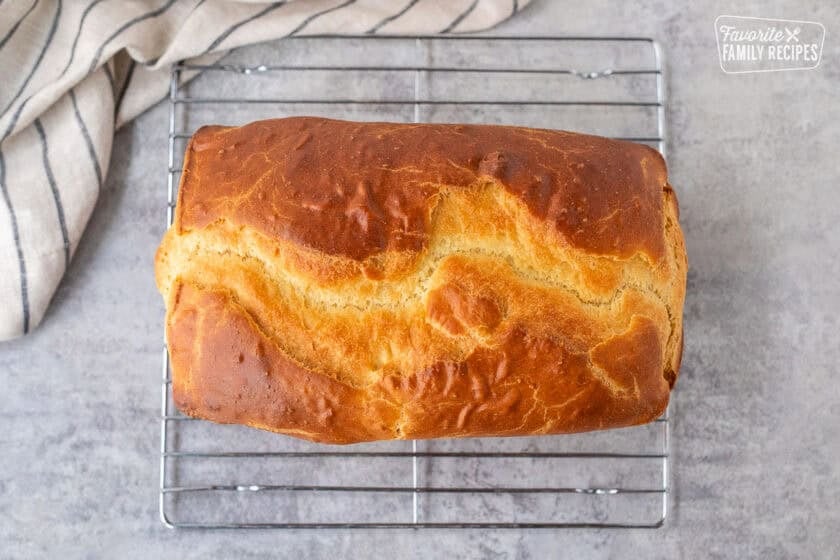
- Pour the bread dough into a buttered 9×5 loaf pan. Bake for 50 minutes.
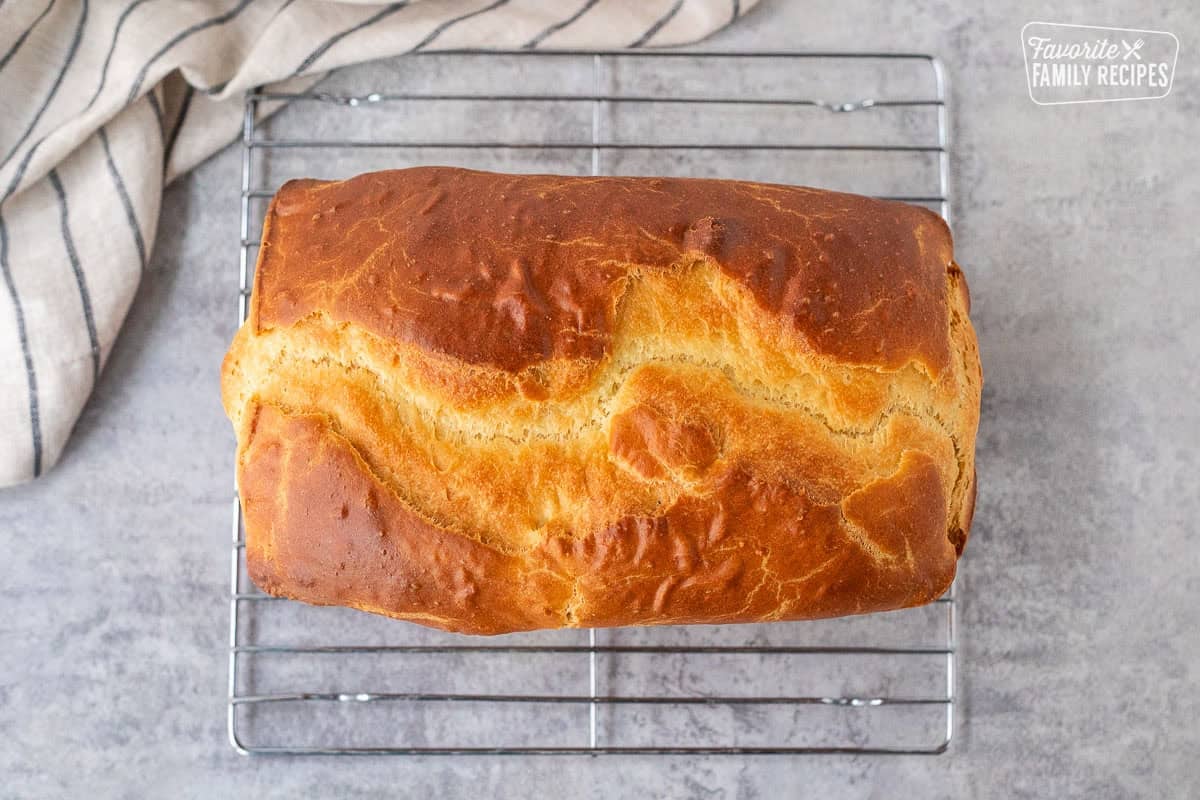
- Let the baked loaf cool for 5 minutes in the pan, then transfer to a cooling rack to cool before slicing.
Suggestions for this Recipe
This is buttery with a hint of sweet flavor and is soft and spongey. This is known to be a large bun or tea cake that is loved by all. Here are a few suggestions and tips to help make this sweet bread even better!
- Baking pan – You will need to use a standard 9×5 loaf pan or equivalent. A Pullman loaf pan also works great. This recipe makes a 1-pound loaf. You can also bake them into mini bread loaves.
- Jam – Serve this bread with butter, honey, honey butter, and jam. We love this Fresh and Easy Strawberry Jam or this Raspberry Peach Freezer Jam recipe.
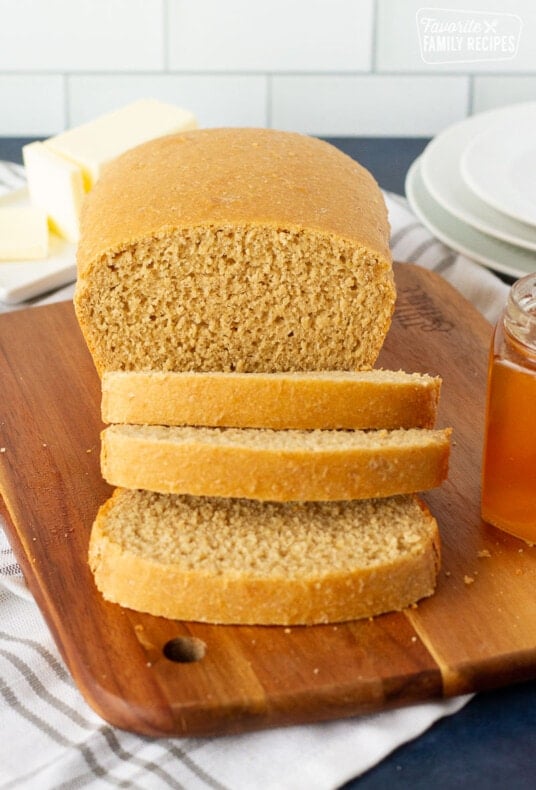
- Slicing bread – When slicing bread, use a serrated knife to make a clean and easy cut each time.
- French toast – Use this bread to make a delicious French toast. It is sweeter and thicker with this sponge-like bread that is ideal for soaking in the cinnamon flavor.
I’ve been making This bread for years as it’s a family favorite. I’ve always used an angel food cake pan for baking. Works beautifully no matter how much it rises and easy to slice.”
-Gina
Frequently Asked Questions
The Sally Lunn Eating House is in Bath, England started all the bread recipes. It is assumed that the bread recipe was brought to Bath in the 1680’s by Huguenot refugee named Solange Luyon. Later they think that her name was changed to Sally Lynn.
Sally Lunn Bun tastes like a soft, spongey, delicate bread with a sweet and buttery flavor. Enjoy this bread with jam, honey, or butter. It is similar to a French brioche.
A Sally Lunn bath bun has a sticky top laced with sugar crystals and fruit compared to a smaller and flatter Sally Lunn. A lot smaller and flatter than the Sally Lunn, the Bath Bun has a sticky top laced. The bath bun looks similar to a soft bread roll.
This Sally Lunn bread is a special bread that is overly soft. The secret to this soft bread is the water and fats in the bread. This will help keep the bread stay fresh and spongy longer.

Storing and Freezing Homemade Sally Lunn Bread
Sally Lunn bread usually doesn’t last that long. If you are lucky enough to have leftovers, place the uncut or sliced bread into a ziplock bag or an airtight container for up to a week or if the bread begins to harden.
- Freezing – Sally Lunn Bread freezes beautifully! Freeze tightly covered or in a freezer-safe bag and it’ll stay nice and fresh in the freezer for a couple of months.
- Frozen slices – For even more ease you can slice the loaf and then freeze it. Then all you have to do is pull out a couple of slices at a time, toast them up, and enjoy with a slather of butter and jam.
More of our Favorite Bread Recipes
Most of our meals just don’t feel complete without a side of warm, fluffy rolls or bread. Bread in general can be scary to make, but it really is a simple process for each recipe. Here are a few of our very favorite bread recipes to try!

Sally Lunn Bread
Ingredients
- 1 cup hot milk
- 1/2 cup melted butter, or ¼ pound
- 1/4 cup sugar
- 1 teaspoon salt
- 1 package dry yeast
- 1/4 cup warm water
- 3 eggs
- 3 1/2 cups white flour
Instructions
- Mix the hot milk, melted butter, sugar, and salt in a large mixing bowl (a stand mixer works great) and let cool until lukewarm.

- In a separate bowl, whisk the yeast into the warm water and let it stand for 5 minutes to dissolve and get a little frothy.
- Add the dissolved yeast and the eggs to the first mixture and beat vigorously.
- Using a hook attachment for the stand mixer, gradually add the flour and mix for 3 minutes.
- Cover bowl loosely with plastic wrap or a towel.
- Let the dough rise until doubled in size. This should take about 1 hour.
- Preheat oven to 350. Pour the mixture into a buttered loaf pan. Bake for 50 minutes.
- Let the loaf cool for 5 minutes in the pan then transfer to cooling rack to let it cool more before slicing.


Equipment
- 9x 5 loaf pan
Notes
How to Freeze Sally Lunn Bread
- Freezing – Sally Lunn Bread freezes beautifully! Freeze tightly covered or in a freezer-safe bag and it’ll stay nice and fresh in the freezer for a couple of months.
- Frozen slices – For even more ease you can slice the loaf and then freeze it. Then all you have to do is pull out a couple of slices at a time, toast them up and enjoy with a slather of butter and jam.
Nutrition
Nutrition information is automatically calculated, so should only be used as an approximation.
Love this recipe?
We want to hear from you! Please leave a review.
I made this while we were snowed in this weekend. I followed the recipe to the letter and it came out beautiful. I don’t have a 9×5 loaf pan so used my Bundt pan like another person mentioned. Only needed to bake 35 minutes. My whole family enjoyed it warm out of the oven. Thanks!
Nothing like warm bread on a cold day, so glad to hear everyone liked it!
I’ve made Sally Lunn for years. I’m 81 years old and have been using my grandmother‘s recipe. She was married in 1870. In those days, recipes assumed people knew how to bake, to proof yeast, liquids the correct temperatures, etc. I wanted a recipe that my great-granddaughter could follow someday. I threw the batter out. It was like soup. Sally Lunn batter is more like cake batter. I too late assumed this recipe meant 1/4 cup of butter, not 1/4 pound. I kept adding more flour. I was surprised to see that people liked this recipe. I wonder if they followed the recipe and still ended up with bread? Any thoughts?
I’m sorry this recipe didn’t work out for you. I’m not sure what happened, but I recently made this bread and it turned out great. I added new photos in the recipe card. If you click on the camera icon at the top of the card, you can see the step-by-step photos of how to make the bread. I changed the butter measurement to cups in the recipe to avoid confusion for people in the future. I had kept it in pounds because that is how it was written in my great-grandmother’s recipe. I appreciate you bringing this to my attention. Hopefully the changes I’ve made and the added step photos will help!
My husband made this bread. He’s the breadmaker in the family and he likes to weigh out the ingredients especially for breads.
How did you like the bread?
Followed the instructions completely after double checking all ingredients. So disappointed. After adding the 3 and a half cups of flour it was so hard to mix then it did not rise. Tried baking it anyway and ended up with a brick of a loaf. Measurements must be off somewhere as this was a disaster.
Rosemary, I’m so sorry this recipe didn’t turn out for you. I’m not sure what happened. We haven’t had any complaints on this recipe before, and I’ve never had a problem with it. I will make this in the next couple of days and double check the recipe is still accurate. Thank you for letting us know.
I love this recipe. It makes the best bread. I used 51/2 cups of flour and I let it rise, punched it down, put in 9×12 greased loaf pan and let rise again. Then baked it for 35 minutes at 350 degrees. This made a great tasting bread that is my family’s favorite
I’m so happy you like this recipe. Thank you for sharing your experience with it and for the 5-star review! 🙂
Super easy and tastes so good! I like that there’s only 1 rise and it can go into the oven. Also, this worked well for high elevation! Thank you for a great recipe.
You are very welcome!
My mom used to make Sally Lund on occassions, but it was similar to corn bread made with baking soda. Made with yeast, it is a million times better. My husband loves it and asked me to make again.
I used the one rise method as directed and it came out beautifully! I used two loaf pans just in case. I think I am trying just one today.
I’m so happy you like the recipe! Thank you for your comment!
I have four other recipes for batter breads, and none of them require a second rise, so I was confident in that regard. My bread [baked in a tube pan] was a tad over-done at 35 minutes, so fifty minutes would have ruined it. I am sorry I left it at a friends house, so I won’t be able to try it as toast. Not bad for a colonial bread, but definitely boring for me, and it would have been much better had I whipped up something sweet to put on top. I think this recipe was everything its supposed to be. This is not a reflection of your recipe, but more that the bread just didn’t wow me.
Hi,
I made the recipe in a bread machine. Part way through I had to put in more then 2 c.of flour as it was soup. This is just a small batch.1x.
Have been playing the recipe for adding more floùr almost 3 cup.
Perfect Sally Lunn bread!
To the 800 people who asked about a second rise, the answer is NO, you don’t need a second rise. I made this for the first time today precisely because it seemed so easy and it was. My only variation was that I used bread flour because I wanted to use up what I had. It came out akin to light and airy biscuits in texture. I’m also curious to try this by giving it a good knead to see what results I get. That said, follow the recipe the way it’s written and you won’t be disappointed.
Delicious! More like cake than bread. I followed the one-rise instructions. It rose big and beautiful in the oven and did not overflow my 4.5″x8.5″ (measured at the bottom) loaf pan. I let it cool in the pan for 10 minutes or so before turning it out because it seemed a little delicate. I have been looking for a recipe for “Mickey Cake” a la Maurice Sendak’s “In the Night Kitchen”. I think this is the one! Milk in the batter, milk in the batter, we bake cake and nothing’s the matter! Thank you for sharing your recipe.