We may earn a commission when you click on the affiliate links in this post.
Meat and cheese trays are a great appetizer or an easy way for guests to make their own sandwiches. Perfect for parties, potlucks, BBQs, or family gatherings!

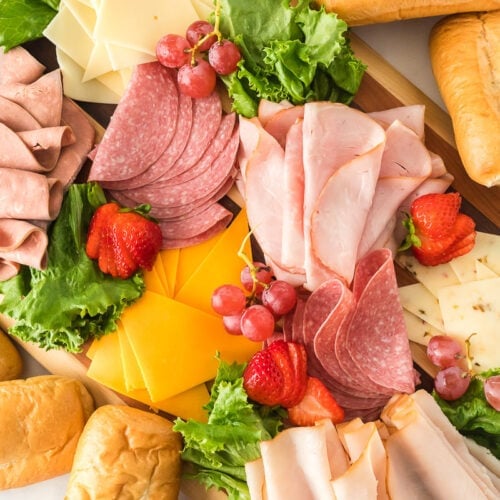
Meat and cheese trays are always a hit at family gatherings. You can serve them on the table as-is, or you can serve them alongside rolls or bread slices so your guests can make sandwiches with the meat and cheese. They are so much fun to garnish and make look pretty! Plus, they are SO EASY to make up. You can whip up a meat and cheese tray faster than you can make most appetizers.
Meat and Cheese Tray vs. Charcuterie Board
This meat and cheese tray is more of a deli-style platter than a fancy charcuterie board. It is a perfect setup for making deli sandwiches or serving as more of a catering platter. We make trays like this for game-day parties, baby showers, and work meetings. I’ve even seen these quite commonly at wedding receptions, and can’t help but be tractor-beamed in to fix a quick deli slider, before making the rounds to the dessert table. Always hits the spot!
As opposed to the deli platter style, charcuterie boards typically feature everything as more bite-sized with more textures and dips. They are used more as appetizer platters or snacky trays that are not a full meal.
If you are going for the charcuterie board look, start with the board and assemble the meats separately around the board, dividing by types of meat. Do the same for cheese until the board looks full. Lastly, add bread, lettuce, and fresh fruits to garnish the board and fill in the spots that are empty. Make the perfect tray that will be loved by both kids and adults!
We have LOTS of great charcuterie board ideas! If a charcuterie board is what you are looking for, check out these fun recipes:
How to Make a Charcuterie Board
Christmas Charcuterie Board
Dessert Charcuterie Board
Halloween Charcuterie Board
Breakfast Charcuterie Board
For the Meat
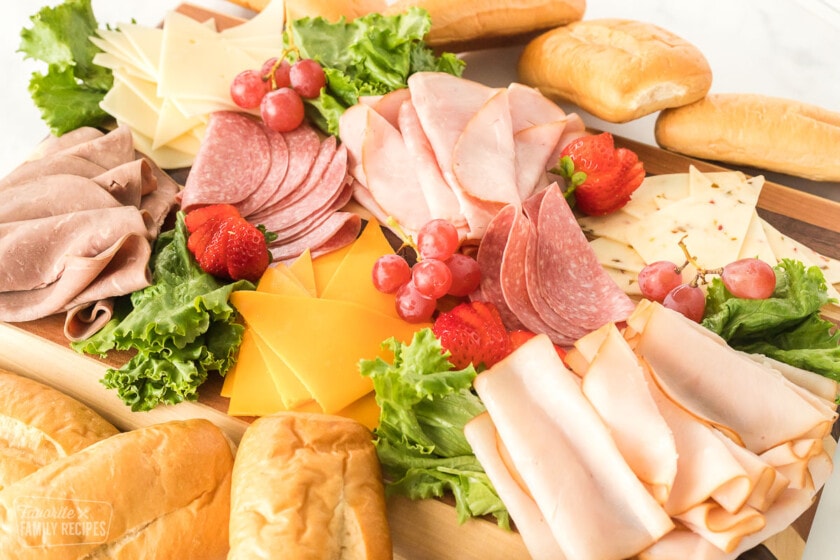
You’ll want to choose at least two to three different kinds of deli meats. This is your tray, so pick your favorites. I always love the classic turkey, ham, and roast beef deli meats, but pick what you and your guests will most love to eat.
- Turkey – Try honey, maple, cajun, or smoked turkey.
- Ham – Black forest, honey, smoked, Virginia, maple, or brown sugar.
- Roast beef – Choose a thin cut to a thicker cut of roast beef, depending on your preference.
- Salami – This is a type of cured meat that is from pork, beef, or veal. Salami is flavored with garlic and other herbs to add extra flavor.
- Pepperoni – This reddish-colored meat is popular on pizzas, but is perfect for adding an extra boost to any sandwich. Pepperoni comes in various sizes that is easy to decorate a tray with.
- Pastrami – This is made from beef brisket, cured in spices, and cold cut. The main ingredient of spices in pastrami is fresh black pepper. Usually, on the edges of the thicker meat, you can see and feel the pepper.
- Bologna – A mixture of meats can make up bologna. It is a softer meat that is popular with younger kids.
- Corned beef – An Irish traditional beef that can be made into a deli meat. It still has the same great flavor as a roast.

Variations and Tips for Meat
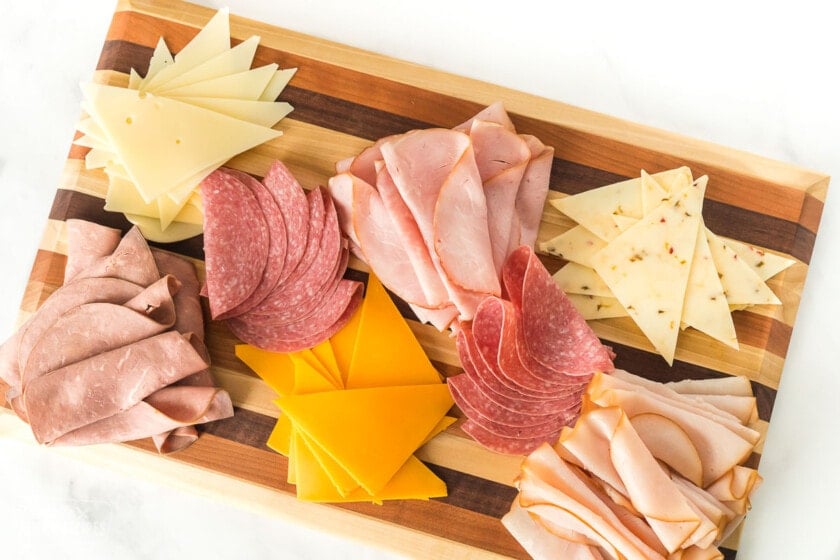
When assembling the deli tray, you are the artist and the tray is your canvas. Choose a fun mix of meats to give the tray color and variety. Learn how to fold and roll the meats for added artistic flair. Follow the tips below to give your tray the perfect presentation of meats for your next party!
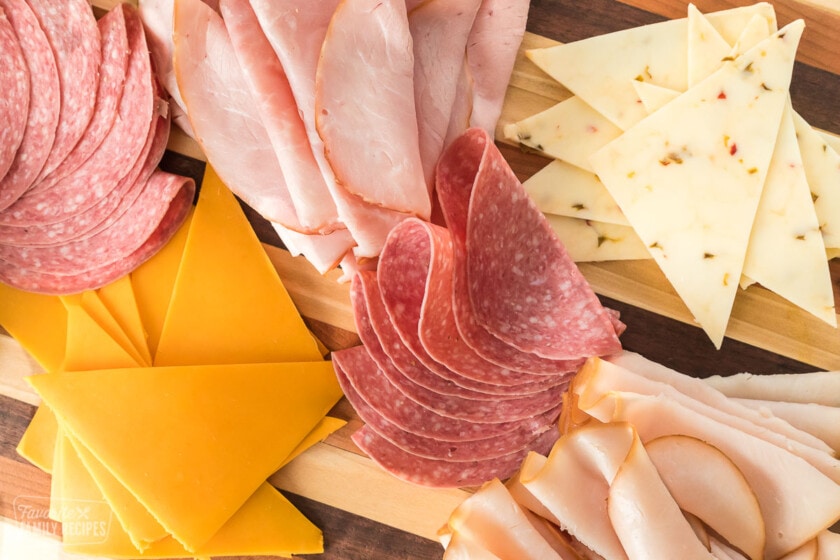
- Know your meats – It is a good idea to separate the turkey and the roast beef on a deli platter. The roast beef is really dark and can discolor the turkey if it is sitting next to it.
- Rolling and folding meat – For purposes of folding and/or rolling the meat, you will want to have it sliced fairly thin. You can ask your deli to slice it as they would a typical “sandwich slice”. It will be easiest to ask your deli to give you the slice amount rather than the weight you are looking for. For meat and cheese trays, you will want ten slices of each kind of meat.
- Serving deli meat – When preparing the meat to be placed on the tray, you can either roll it or fold it. Rolling is great for when you are serving the meats on their own (not as sandwiches). If you are wanting to use the meat for your guests to make sandwiches, it is better to use the folding method. That way it is easier to pick up and place on the roll or bread. When folding, you just fold like an accordion, back and forth with about 1 1/2″ folds.
- Stack meat – When stacking the folded meat, try to make it look like a pyramid. You will put four folds (or rolls) of meat close together on the tray, then three folds of meat directly over those, then two, then one. You will do the same for each of the meats until you have several stacks of meat. This works well on any shaped platter you are using.

For the Cheese
You can use as many different kinds of cheeses as you would like for your deli tray. The harder sliced cheeses (like cheddar or Swiss) work best for meat and cheese trays because they don’t stick together as much and can easily be picked up with tongs.
- Cheddar – There are several different flavors of cheddar cheese. White cheddar and regular (yellow) cheddar both have great flavoring and are popular on sandwiches.
- Swiss – Swiss or baby Swiss cheese is cheese with holes in the cheese. It is a sweet and mild flavor that everyone loves to pair with roast beef deli meat. Swiss cheese can also be melted.
- Provolone – Complex and sharp flavor with sliced provolone.
- Pepper Jack – Add a kick of spice to your tray with pepper jack cheese. Speckled with peppers (often jalapeño) and spices, this cheese is a favorite on sandwiches.
- Havarti –This is similar to Monterey Jack cheese. It has a buttery and sweet flavor to it.
- Muenster – A mild and creamy cheese that goes well with dijon mustard.

Helpful Ideas for a Cheese Tray
Similar to the meats, pick a variety of colors and flavors of cheese for the most impressive presentation. Here are some tips to make the most of the cheese on your deli tray:
- Stacking cheese – Once again, ask your deli to go by the slice instead of the weight. You will want eight “sandwich” sized slices for each kind of cheese. Once you have your cheese squares, stack them directly on top of one another and slice them all diagonally (do this separately for each kind of cheese). This will give you two stacks of 8 triangles for each kind of cheese (so four stacks total).
- Separate the cheese – Taking your stacks of cheese, you may have to separate some of the slices a little to get the perfect fan effect. Or you can separate the cheese and place them on top of each other one at a time to make the fan, but it might just take a little longer. When placing them on the tray, put each “fan” in a different direction and fill up the remaining space on the tray.
- Pick the right cheese – Because this is a deli tray, we used sliced cheeses. Crumbly, soft cheeses, or spreadable cheeses like blue cheese, feta, goat cheese, or brie, are not the best for deli-style platters. Those types of cheese work best for more of a charcuterie-style cheese board.
Garnishing Your Meat and Cheese Tray
Now you can let your creativity run wild, as you garnish your tray any way you would like. For our tray, we rolled up some leafy green lettuce like a bouquet, ripped the excess off the bottom, and placed it in the hole in the middle. You can also use kale, red-leaf lettuce, or anything else pretty and leafy.
When placing the meat on a round tray, be sure to leave some room right in the middle. You want the meat and cheese to be in a ring. If you don’t have circle guides on your tray, you can place a condiment cup or any other small, round object in the middle to prevent you from overlapping any of the meats or cheeses in the middle.
We also like to use fruit for garnish. To slice the lemons, limes, and kiwis, we did a deep zig-zag cut around the center and simply pulled it apart once it was cut all the way around the axis. This gives it that cool 3D star shape in the middle. For the strawberries, we did several parallel cuts across the strawberry, cutting all the way through, then fanned it out. Lastly, cut the stems of grapes into small bunches for an easy way to pick up the grapes without utensils.

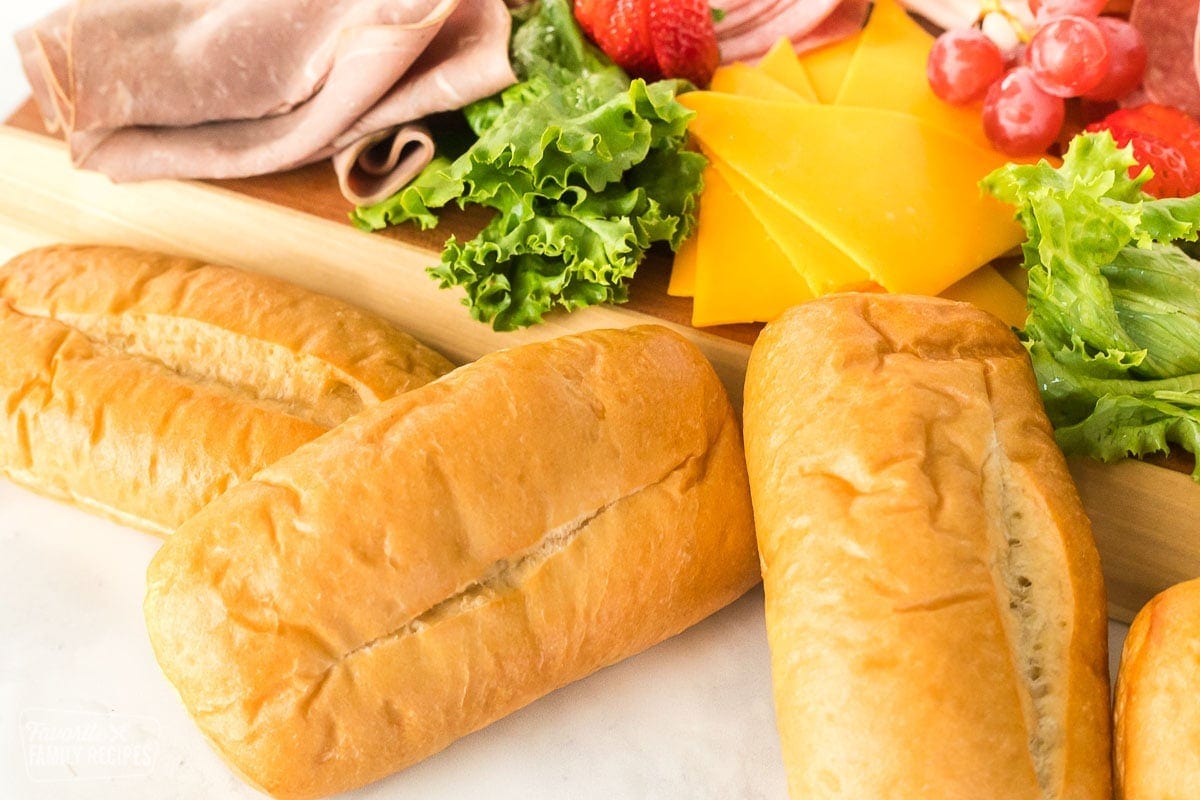
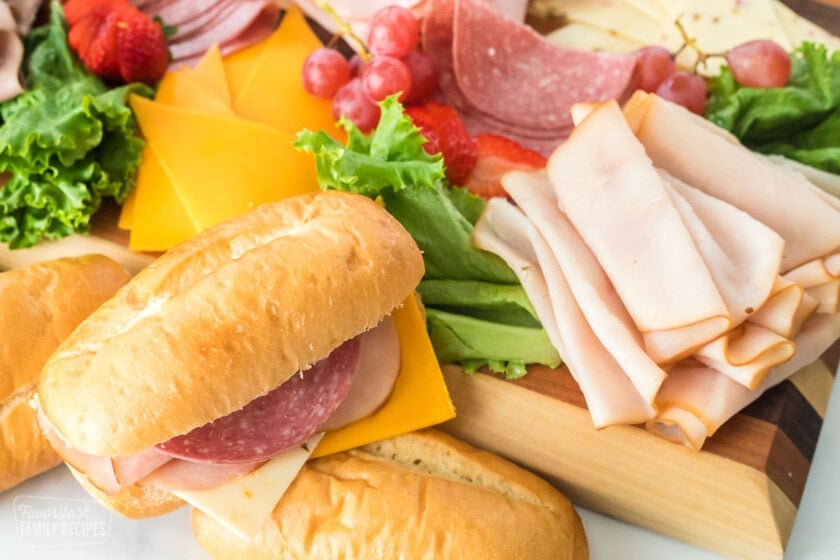
For Making Sandwiches
As mentioned above, you can keep it strictly to meats and cheeses for serving, or you can include bread or rolls for sandwich making. There are so many bread types that you can use.
If you plan to make this a sandwich tray, be sure to serve with little condiment dishes of mayonnaise, mustard, Dijon, or pesto. You can also add plates or small bowls of olives, sliced pickles, or sliced tomatoes.
- Dinner Rolls
- Homemade Crescent Rolls
- Croissants
- Mini bagels
- Small hoagies
- Sub-roll bread
- Honey Whole Wheat Bread
- Pretzel rolls
“This is a fantastic tray when hosting a lunch! The presentation was perfect! Everyone really enjoyed it.”
-Brandy
Frequently Asked Questions
Making your own can be less expensive, depending on the types and quantity of deli meat and cheese that you purchase. The nice thing about making your own tray, is that you can customize it exactly with the ingredients and decorating that you like.
It is best to keep the meat and cheese tray in the refrigerator until ready to use. The tray can sit out at room temperature for about hour then needs to be kept cool again. If you plan on having it out longer, consider using a deep walled serving tray and filling with ice. Place the meats and cheeses over the ice or on a parchment paper liner over the ice. Place a cover over the tray when not in use.

Storing and Serving a Meat and Cheese Tray
When you are making a meat and cheese tray, it is best to prepare it the same day you are serving it. If you aren’t going to serve it immediately after you make it, be sure to cover it well and refrigerate until ready to serve. It will stay good in the fridge for up to 24 hours. I wouldn’t recommend going over that. When setting it out to serve, don’t let it sit out too long. No more than 2 hours.
How to Make a Meat and Cheese Tray
How to Make a Meat and Cheese Tray
Video
Ingredients
- 10 slices deli ham
- 10 slices deli turkey
- 10 slices deli roast beef
- 8 slices cheddar cheese
- 8 slices Swiss cheese
- Green leaf lettuce, for garnish
Instructions
- Fold or roll each deli meat and place on tray in stacks (see notes above). Space meat apart on a tray or if using a round platter or plate, place in a ring leaving an open space in the middle.

- Place 8 slices of each type of cheese in a stack and cut diagonally into triangles. Fan out each stack of cheese and place on on the tray.
- Garnish with green leaf lettuce and/or fruit in the empty spaces on the tray.
- Serve with dinner rolls or bread.
Nutrition
Nutrition information is automatically calculated, so should only be used as an approximation.
Love this recipe?
We want to hear from you! Please leave a review.
I have been doing a tray for years almost exactly like this one. The only differences are that I add pickles and olives to mine. It has always been a fan favorite of my family and friends.
Made this for a client appreciation event and what a hit!
This is the greatest idea when you have no idea what people might want to eat. I make this very similar board for and easy Christmas Eve dinner when the family gets together. Having a nice selection of deli meats, cheeses, small rolls and some party rye bread is perfect. I also have small bowls of different condiments for the fam.
Perfect for 2 or ???. This is such an easy and versatile appetizer or even a light meal.
This is a fantastic tray when hosting a lunch! The presentation was perfect! Everyone really enjoyed it.
I really enjoyed this guide for making easy meat and cheese trays. I will be making a lot of these trays this summer.
The perfect solution for entertaining a crowd – great tutorial!
This would be a great way to prepare lunch for my boys on the weekend. Easy enough for them to grab what they want and everyone is happy. Love it!
I love information like this for helping me make a pretty tray.
Meat and cheese platters r the best things invented. Everyone loves sandwiches, and with the lettuce, tomatoes, and pickles it makes for a beautiful luncheon.
Thanks for this tutorial! Do you have a link for the tray?
It was provided by Albertsons, so I don’t have a link. Sorry!
Love all the tips!! I am all about making our own too! Prettier & tastier!
I love making my own trays. Then I get exactly the meats, cheese and other items I want on there. So much better.
I use to always just buy the trays from the store but this is so easy and so much cheaper!
sounds delishis