We may earn a commission when you click on the affiliate links in this post.
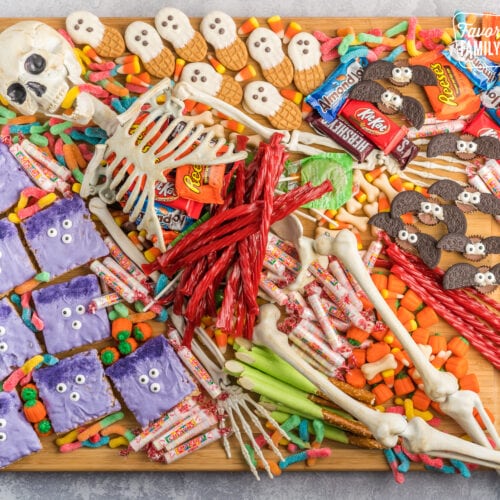
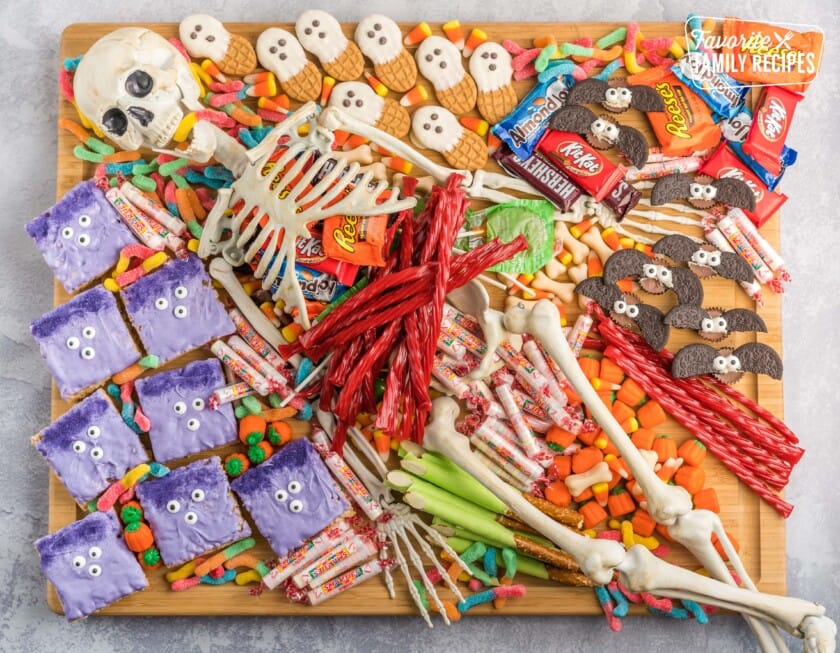
Turn your snack table into a haunted spectacle with a Halloween Charcuterie Board that layers playful chocolate-dipped treats, bright gummies, and just enough salty crunch. I like to build mine around a posable skeleton, then color-block the candy so every inch looks full and festive. It’s easy to prep ahead, simple to scale for any crowd, and completely customizable. Set it out and let everyone graze between tricks, treats, and spooky stories.

5 Star Reviews ⭐️⭐️⭐️⭐️⭐️
“This is a spooktacular idea! The kids will love it especially since we are planning just to stay at home this year.” – Abi
“This is such a great idea! I can’t wait to make this for a little get together! Looks so beautiful and colorful!” – Beth
“What a creative way to serve treats! This is like a cross between a recipe and an art project. Perfect for a kids Halloween party!” – Anissa
Halloween Party Approved
This Halloween Charcuterie Board is my favorite spooky showstopper for a Halloween party—bright, playful, and packed with candy, chocolate, and a few salty bites for balance. I like to use a posable skeleton as the centerpiece and surround it with easy, make-ahead chocolate-dipped “creature” treats and colorful Halloween candy. It’s such a fun way to feed a crowd because there’s truly something for everyone!
This is a little different from a Traditional Charcuterie Board but a fun way to give it a seasonal twist. Be sure to also check out our Christmas Charcuterie Board, Brunch Charcuterie Board, and Valentine’s Day Dessert Board.
Why I Love This Board
- Mostly make-ahead with simple store-bought add-ins
- Crowd-pleasing mix of sweet, salty, chewy, and crunchy
- Scales up or down for any party size
🩷 Kelsey
Ingredients You’ll Need
Board & Props
- 18×24 wooden cutting board (or similar platter)
- 1 posable skeleton (optional but fun!)
- Small bowls/ramekins for loose candies
- Parchment paper (for setting dipped treats)
Monster Rice Krispie Treats
- 8 Rice Krispie treats
- 5 oz white chocolate melting wafers
- Purple food dye
- Candy eyes
- Purple sprinkles
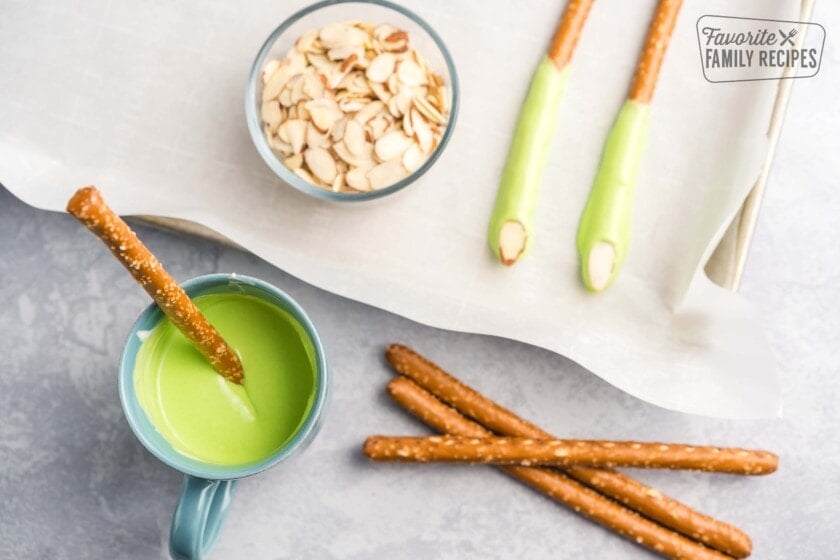
Pretzel Witch Fingers
- 8 pretzel rods
- 10 oz white chocolate melting wafers
- Green food dye
- Sliced almonds (for “nails”)
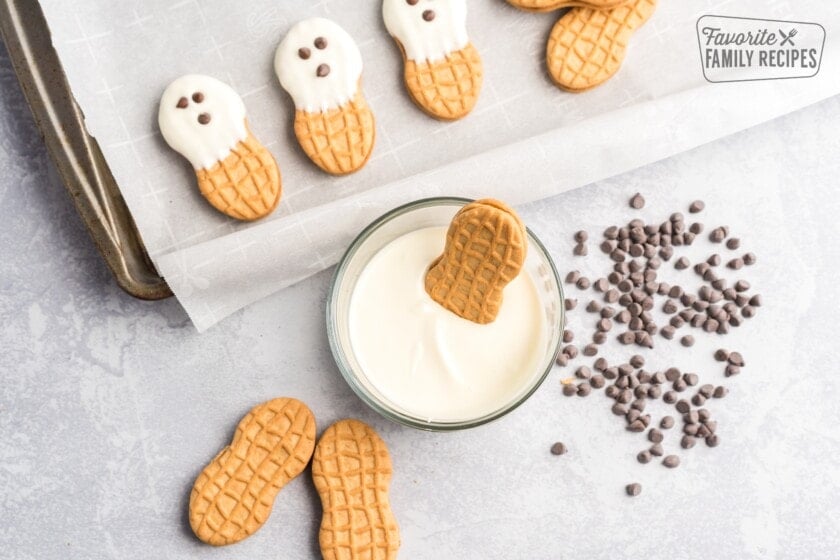
Cookie Ghosts
- 8 Nutter Butter cookies
- 5 oz white chocolate melting wafers
- Mini chocolate chips (eyes/mouth)
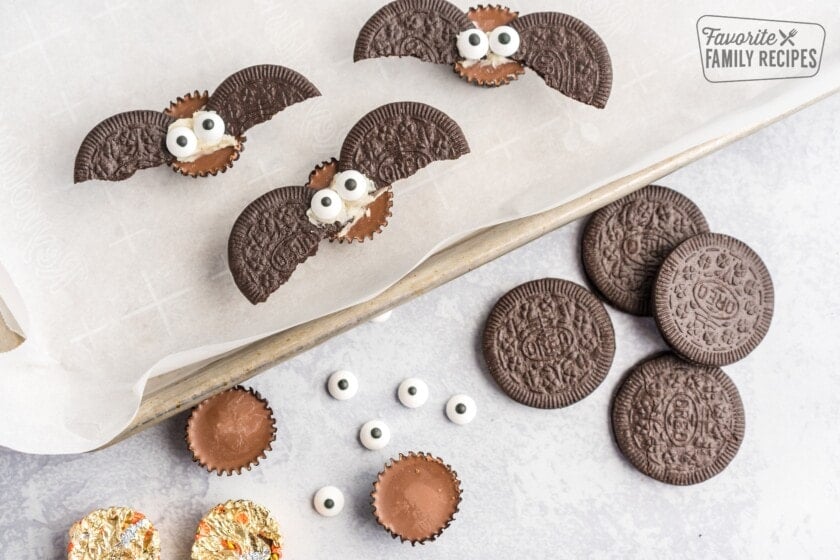
Oreo Bats
- 8 Mini Reese’s Cups
- 8 Oreo Thins
- Candy eyes
Additional Candy & Salty Fillers
- 18 oz Smarties
- 16 oz red licorice
- 15 oz assorted Hershey’s candy (keep in wrappers for color)
- 28 oz sour gummy worms
- 40 oz candy corn
- Optional salty balance: popcorn, pretzels, nuts, roasted pumpkin seeds
Ingredient Additions & Substitutions
- Fresh bites: blackberries, grapes, strawberries, blueberries, orange slices (add just before serving).
- Cheesy cut-outs: slice cheddar and punch out pumpkins/ghosts with mini cookie cutters for a savory touch.
- Peanut-free swap: replace Nutter Butters with graham crackers; swap Reese’s Cups for Mini Oreos.
- Chocolate options: candy melts/wafers melt the smoothest. You can use chocolate chips with a tiny bit of coconut oil; don’t add oil to candy melts (they already contain it).
- Skeleton optional: skip the full skeleton and use just the hands—or decorate with plastic spiders, eyeballs, or mini pumpkins.
How to Make a Halloween Charcuterie Board
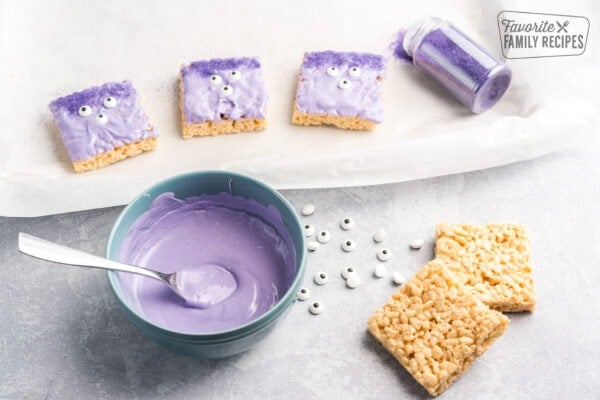
- Monster Treats: Melt white wafers; tint purple. Dip one side of each Rice Krispie treat, add candy eyes and sprinkles “hair.” Set on parchment to harden.

- Witch Fingers: Melt white wafers; tint green. Pour into a tall cup and dip pretzel rods. Press a sliced almond on the tip as a “nail.” Set to harden.

- Ghosts: Dip one side of each Nutter Butter in melted white wafers. Add mini chocolate chips for eyes and mouth. Set to harden.
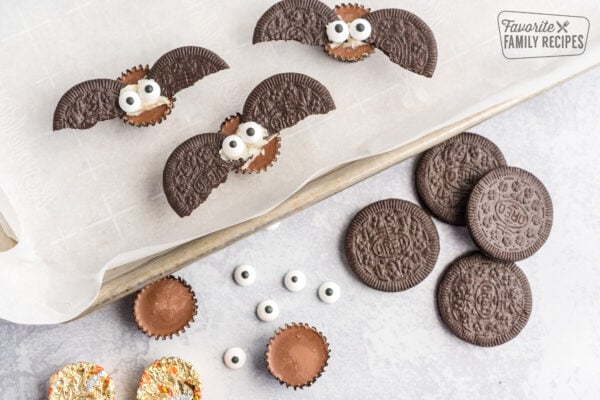
- Bats: Keep the inner paper on the Mini Reese’s. Split Oreo Thins and remove crème (save it). Break cookie halves into “wings.” Use the saved crème as “glue” to attach wings and candy eyes to each Reese’s.
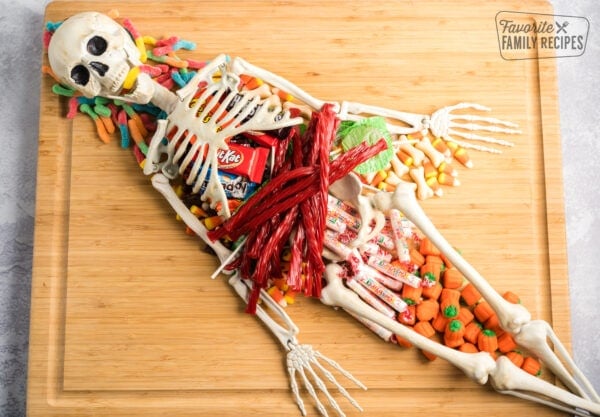
- Place the skeleton diagonally across the board. Tuck candy into the ribcage and around the body to anchor your layout.

- Arrange the larger treats (Monsters, Witch Fingers, Ghosts, Bats) first, spacing them around the skeleton to create balance and color clusters.

- Pour in wrapped chocolates, licorice, Smarties, gummy worms (let one hang from the skeleton’s mouth!), and candy corn. Use small bowls for loose pieces. Tuck salty snacks in for contrast.

- Fill every gap (abundance = wow factor). Add tiny props (plastic spiders), then set out scoops/tongs and small plates.
Notes on Melting Chocolate
- Melt wafers gently (microwave 50% power in short bursts, stirring) or use a double boiler.
- If using wafers, do not add oil—this can ruin the texture.
- Work on parchment and let everything set fully before moving to the board.

Charcuterie Board Tips (Halloween Edition)
- Keep wrappers on chocolate minis for color and easy grabbing.
- Vary textures: chewy gummies + crunchy pretzels + creamy chocolate = perfect mix.
- Work from big to small: anchor pieces first, then fill gaps with bite-size candy.
- Create height: use ramekins or an upside-down bowl under parchment for levels.
- Color clusters: group like colors for impact, then bridge with neutrals.
- Mind the melt: build and display away from direct sun or heat; chill chocolate treats briefly if your kitchen is warm.
- Allergy labels: note any items with nuts; keep peanut-free candies on their own side.
- More tips: see our post on How to Make A Charcuterie Board.
Frequently Asked Questions
For 10–12 people, an 18×24 board works well. For smaller groups, scale down or use a rimmed sheet pan lined with parchment.
Plan about 4–6 ounces of candy per guest when you’re serving other snacks or a meal, a bit more if this is the main attraction.
Yes! Make the dipped treats 1–2 days ahead and store airtight in a cool place. Assemble the board a few hours before the party; add fresh fruit right before serving.
Candy melts/wafers give the smoothest finish and set quickly. Chocolate chips work if you stir in a tiny bit of coconut oil. Avoid adding oil to candy melts.
Display indoors away from windows or heat sources. If needed, rotate a few backup pieces from a cool spot and refill as the party goes.
Skip Reese’s and Nutter Butters. Use Mini Oreos for bats and graham crackers for ghosts. Keep all nut-free items on one side with a separate scoop.
If you don’t mind a little extra sweetness, try our Butterbeer, it’s delicious and on theme! Or something more fruity, Sparkling Citrus Punch. Or if you like pumpkin go with our Pumpkin Juice Recipe or Pumpkin Spice Steamer.
Leave it out, use just the hands, or swap in cute décor like pumpkins, bats, and spider rings—the layout and candy still shine!

Storing Leftovers
- Unopened/wrapped candy: store at room temp in airtight containers, up to several weeks.
- Chocolate-dipped treats: keep in a cool, dry spot in airtight containers 2–3 days; refrigerate only if your room is warm (condensation can spot chocolate).
- Pretzel rods: room temp is best to keep them crisp; enjoy within 1–2 days.
- Gummies & candy corn: airtight at room temp; keep gummies separate so they don’t tack other candies.
More Halloween Recipes


- Halloween Bark
- Halloween Appetizers
- Halloween Sugar Cookie Recipe
- Candy Apples
- Halloween Deviled Eggs
- Halloween Cake Pops
- 25+ Halloween Dinner Ideas
- Dinner in a Pumpkin
All wrapped up! This Halloween Charcuterie Board is colorful, customizable, and perfect for grazing—whether you’re hosting a big bash or a cozy movie night. I’d love to hear how you make it your own: what candies or spooky touches are must-haves on your board? Tell me in the comments so we can swap ideas! 🎃👻
Halloween Charcuterie Board
Video
Ingredients
For the Monster Treats
- 8 rice krispie treats
- 5 ounces white chocolate melting wafers
- purple food dye
- candy eyes
- purple sprinkles
For the Witch Fingers
- 8 pretzel rods
- 10 ounces white chocolate melting wafers
- green food dye
- sliced almonds
For the Ghosts
- 8 Nutter Butter cookies
- 5 ounces white chocolate melting wafers
- mini chocolate chips
For the Bats
- 8 Mini Reese's Cups
- 8 Oreo Thins
- candy eyes
Additional Candy
- 18 ounces Smarties
- 16 ounces red licorice
- 15 ounces Assorted Hershey's Candy
- 28 ounces sour gummy worms
- 40 ounces candy corn
Instructions
- Make the Monster Treats by melting the chocolate wafers (see post for melting instructions) and mix in the purple food dye. Dip one side of the Rice Krispie Treat into the chocolate. Place the candy eyes onto the chocolate. Place the sprinkles on the top to look like hair. Set on a pan lined with parchment paper and allow the chocolate to set.

- To make the Witch Fingers, melt the chocolate wafers and mix in the green food dye. Place the melted chocolate into a tall cup. Dip each pretzel rod in the chocolate. Place a sliced almond on the tip to look like a fingernail. Set on a pan lined with parchment paper and allow the chocolate to set.
- To make the Ghosts, melt the chocolate wafers. Dip one side of the Nutter Butter cookie into the chocolate. Place two mini chocolate chips to look like eyes and one to look like a mouth. Set on a pan lined with parchment paper and allow the chocolate to set.
- To make the Bats, unwrap the Mini Reese's Cups but don't take off the inner lining. Open each Oreo and scrape the creme filling out. Do not discard. Break each cookie in half to make the wings. Spread some of the creme filling onto the Reese's Cup. Attach the cookie halves to the Reese's Cup using the creme filling. Spread some creme filling where the wings touch and use that to attach the eyes.
- Start out by placing the skeleton diagonally across the board. Stuff the rib cage with candy. Fill in all the spaces in and around the skeleton with candy.

- Next, place the larger chocolate-decorated treats around the board. Then fill in any open spaces with more candy.


Equipment
- Wooden board or serving platter
- Posable skeleton
Notes
- Make chocolate-dipped “creature” treats 1–2 days ahead; store airtight in a cool, dry place.
- Candy melts/wafers set smoothest; if using chocolate chips, add a tiny bit of coconut oil. Do not add oil to candy melts.
- Build from big to small: place skeleton/ramekins first, then larger treats, then fill every gap with bite-size candy.
- Keep wrappers on mini chocolates for color and easy grabbing; color-block candies for a bold look.
- Add salty balance (pretzels, popcorn, nuts, roasted pumpkin seeds) for sweet–salty variety.
- Peanut-free option: swap Nutter Butters → graham crackers and Reese’s → Mini Oreos; keep nut-free items and utensils separate.
- If it’s warm, assemble indoors away from sun/heat; chill dipped items briefly to set, then keep at room temp to avoid condensation.
- Scale to your crowd; plan ~4–6 oz candy per guest when other snacks are served.
- Add fresh fruit/cheese right before serving (pat fruit dry).
- Use parchment and small bowls to add height and corral loose pieces; set out tongs/scoops and small plates.
- Storing leftovers: wrapped candy keeps for weeks at room temp; dipped treats 2–3 days cool/airtight; pretzel rods are best within 1–2 days.
- The serving size and nutrition information are approximate and are based on one chocolate-decorated treat and about ¼ cup of candy per person.
Nutrition
Nutrition information is automatically calculated, so should only be used as an approximation.
Love this recipe?
We want to hear from you! Please leave a review.
Hi,
I love the Skelton candy board. What size is the Skelton that you used? 3ft-4ft? I want to make this for my grandsons. They will love these treats.
Yes my skeleton was about 3 feet tall! Hope you enjoy!
This is a spooktacular idea! The kids will love it especially since we are planning just to stay at home this year.
This looks so fun, with lots of cute easy ideas to get in the Halloween spirit.
This is such a great idea! I can’t wait to make this for a little get together! Looks so beautiful and colorful!
What a fun and festive Halloween spread! Not only for kids either! 🙂
What a creative way to serve treats! This is like a cross between a recipe and an art project. Perfect for a kids Halloween party!