We may earn a commission when you click on the affiliate links in this post.
Ready to enjoy sweet, juicy pears all year long? Our easy canning tutorial will teach you how to can pears at home — perfect for both beginners and seasoned canners!

Table of Contents
Preserving Fresh Pears
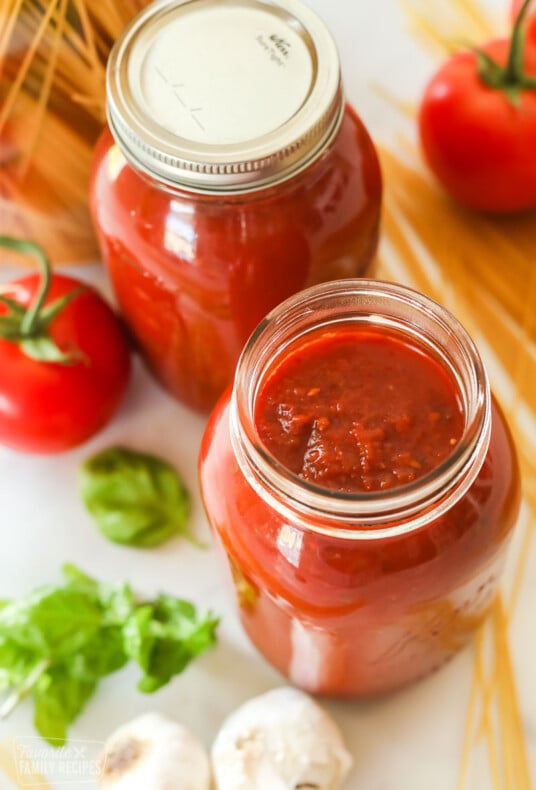
For as long as I can remember, fall has always meant one thing: canning. And not just casual canning either — we go into full-blown, sticky-kitchen, canning-supplies-everywhere mode. From canned peaches, canned tomatoes, canned spaghetti sauce, and canned salsa we spend countless hours in the kitchen, preserving our garden harvest from late July straight through early October.
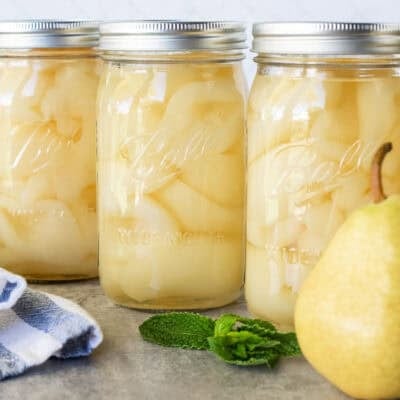
Of course, one of my favorite foods to can is pears — perfectly sweet, tender, and ready to enjoy all year long. If you are new to canning, be sure to check out my Canning 101 post as well as my Water Bath Canning guide for detailed, no-fail tips, and instructions for canning.
Happy Canning!
Erica
What You’ll Need

Canning Supplies
Water Bath Canner – I almost always use a water bath canner for canning — for me, it’s just easier and less stressful. However, you can absolutely use a pressure canner if you prefer; I’ll include instructions for both methods below.
Canning jars, lids, and screw bands – Be sure to use clean, sanitized jars. I like using quart-size wide mouth jars for easy of filling and less mess. You can also use pint jars, just be sure to note the difference in processing times. Don’t forget to use brand new lids every time you can, but jars and bands can be re-used as long as they are in good condition.
Additional canning equipment (not required but very helpful) – Jar lifter (for safely lifting hot jars), canning funnel (helps prevent spills when filling jars), butter knife or plastic spatula (to release trapped air bubbles), ladle (for pouring syrup into jars), magnetic lid lifter (to lift hot lids out of the water).
Ingredients Needed
Pears – Fresh ripe pears, preferably Bartlett or Anjou pears. These pears are easy to peel with a peeler, hold their shape, and process well.
Ascorbic Acid – This will keep your pears from browning while you are working. I like to use the Mrs. Wages “Fresh Fruit Preserver but any kind of ascorbic acid will work.
Syrup – A simple syrup just made from water and sugar is all you need. Adjust the ratios to your own liking depending on how light/heavy you like your syrup (more on this below).
How to Can Pears
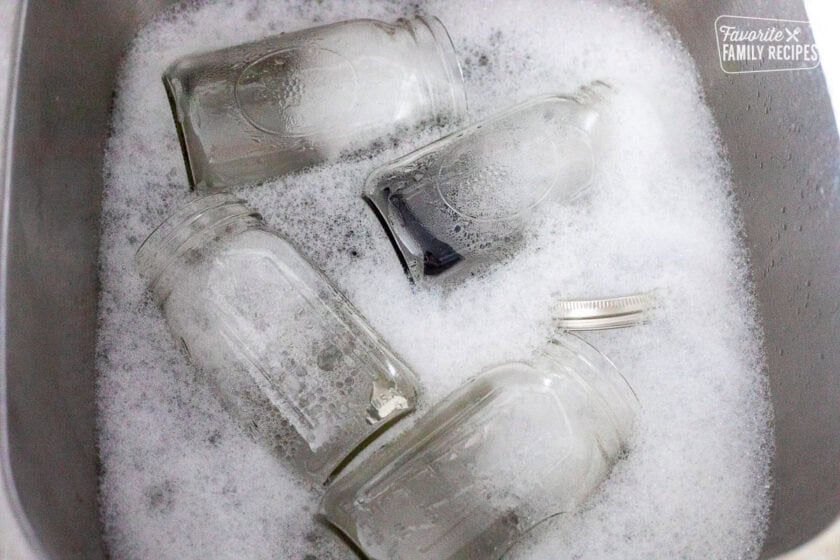
Step 1: Prepare and Sanitize Your Jars

Start by preparing your canning jars. Wash them thoroughly with hot, soapy water, rinse well, and keep them hot until ready to use (this helps prevent cracking when hot liquid is added). You can keep them warm in a canner filled with simmering water or in your dishwasher on the “sanitize” setting. This recipe should yield 4-5 quart jars. If you’re new to canning, be sure to check out my Water Bath Canning guide for detailed tips on sanitizing and prepping jars.
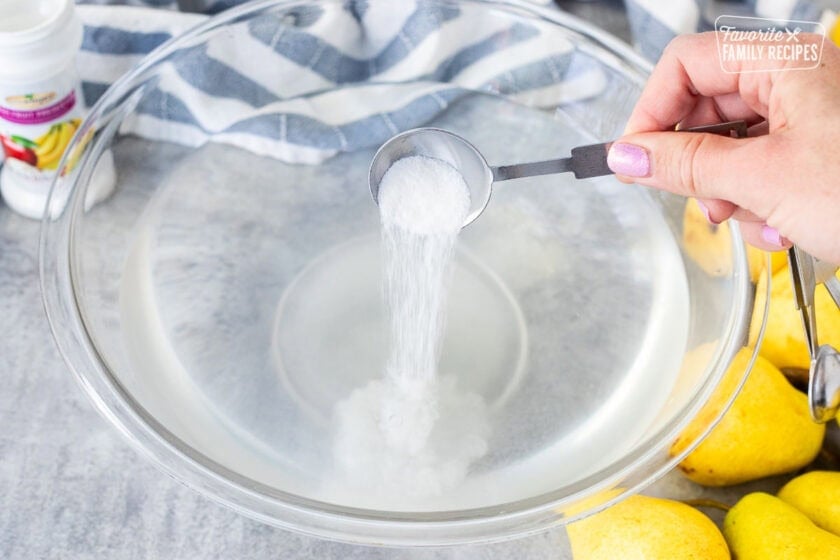
Step 2: Prepare the Ascorbic Acid Solution

To keep your pears from browning while you work, prepare an ascorbic acid solution. In a large bowl, mix 1 gallon of water with 1 level teaspoon of ascorbic acid powder (different from citric acid). If you’re working with a large batch of pears, you may need to double or triple the solution to fit them all. Alternatively, you can mix ½ gallon of water with 3 tablespoons of a fresh fruit preserver that contains ascorbic acid.
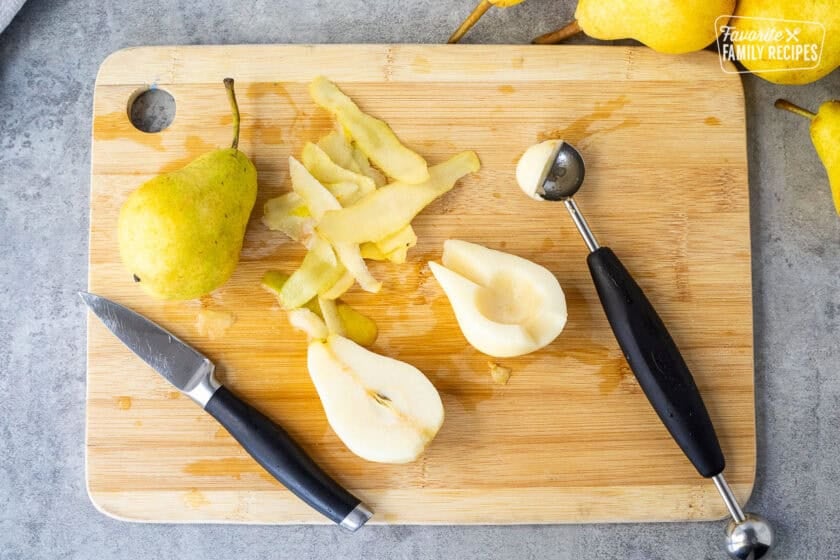
Step 3: Wash, Peel, and Slice Pears

Give your pears a good rinse. Then, using a sharp knife or vegetable peeler, peel the pears. Slice them lengthwise into halves and remove the cores using a melon baller or small spoon. As you work, place the prepared pear halves into the ascorbic acid solution to prevent browning.
Step 4: Make the Syrup
In a large stockpot, combine 8 cups of water and 4 cups of sugar (or your chosen syrup ratio — see my syrup guide below for lighter or heavier syrup options). Bring the mixture to a boil, stirring until the sugar dissolves completely.
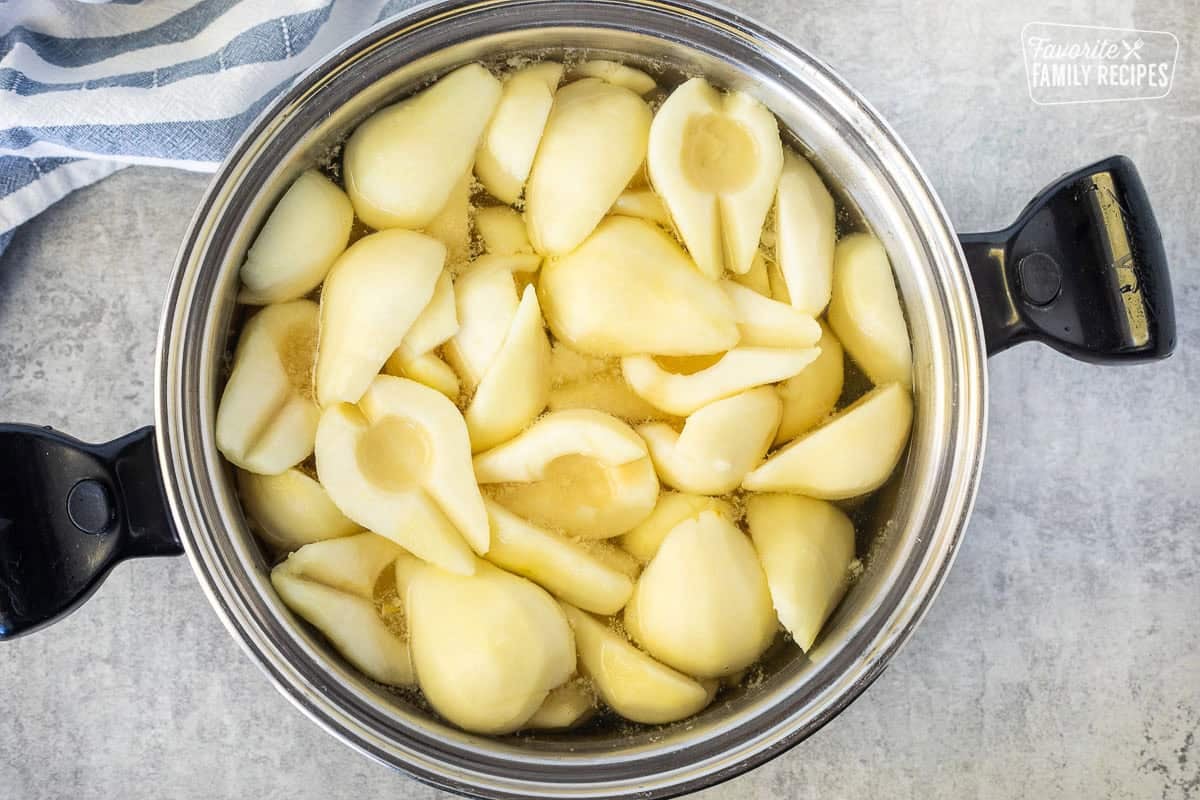
Step 5: Heat the Pears in the Syrup (Hot Pack)
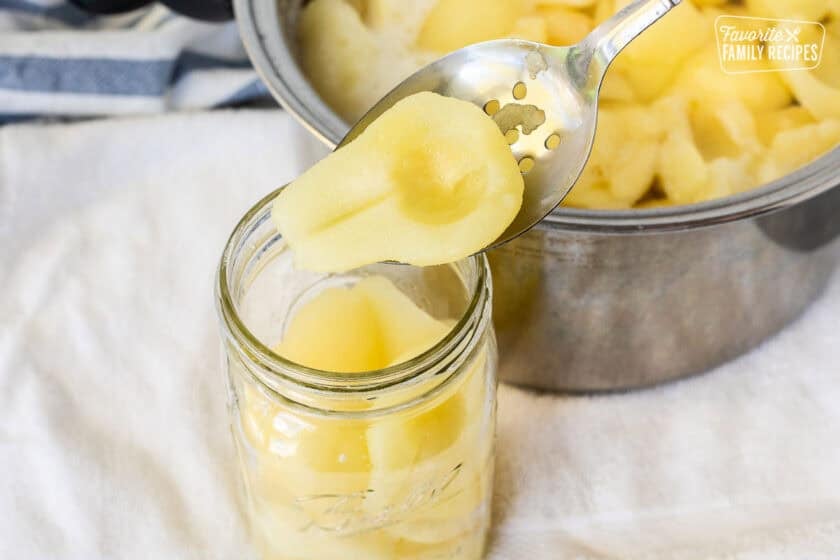
Once your syrup is boiling, drain the pears from the ascorbic acid solution and gently add them to the hot syrup. Bring everything back to a gentle boil and simmer the pears for 4-5 minutes (this is also known as “hot packing”. This helps the fruit heat through and pack more easily into the jars.
Step 6: Fill the Jars

Working one jar at a time, use a slotted spoon to pack the hot pears into your prepared jars. Then ladle the hot syrup over the pears, leaving ½ inch of headspace at the top. Run a butter knife or plastic spatula around the inside of the jar to release any trapped air bubbles. Wipe the rims with a clean, damp cloth, place the lids on, and secure the screw bands until fingertip tight.
Step 7: Process the Jars

Place the filled jars into your water bath canner, making sure the water covers the jars by at least 1-2 inches. Bring to a full rolling boil, then start your processing time based on your elevation. Here are the correct processing times according to the National Center of Home Food Preservation:
- 0-1,000 feet = 25 minutes
- 1,001-3,000 feet = 30 minutes
- 3,001-6,000 feet = 35 minutes
- 6,000+ feet = 40 minutes
Canning Pears Using a Pressure Canner
Place the jars in the pressure canner with the recommended amount of hot water (about 2–3 inches). Lock the lid and vent steam for 10 minutes. After venting, close the vent or add the weight and bring the canner to pressure adjusting for altitude. The National Center for Home Food Preservation recommends 6 pounds for under 2000 ft, 7 pounds for 2,001-4,000 ft, 8 pounds for 4,001-6,000 ft, and 9 pounds for 6,001-8,000 ft. Process for 10 minutes. Once done, turn off the heat and let the pressure drop naturally to zero. Wait 5 minutes, then carefully remove the lid and place jars on a towel to cool.
Step 8: Cool, Check, and Store

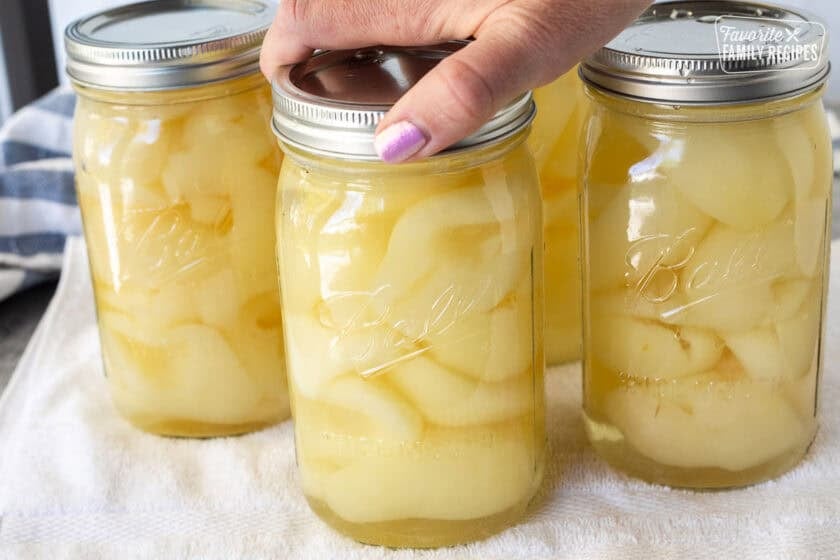
Once processing is complete, carefully remove the jars using your jar lifter and place them on a towel-lined countertop. Allow them to cool undisturbed for 12-24 hours. After cooling, check that the lids have sealed (the center of the lid should not flex when pressed). Label your jars and store them in a cool, dark place. If any jars didn’t seal properly, refrigerate and use those first.
Syrup Options
I like to use a medium syrup when canning pears because it strikes the perfect balance. It’s sweet enough to complement the natural flavor of the pears, but not so sweet that it overpowers their fresh taste. depending on how you plan to use your canned pears, you can easily adjust the syrup to be lighter or heavier to suit your tastes.
Light Syrup (mildly sweet):
- 8 cups water
- 2 ½ cups sugar
Medium Syrup (classic sweetness):
- 8 cups water
- 4 cups sugar
Heavy Syrup (very sweet, dessert-style):
- 8 cups water
- 5 ½ cups sugar

Expert Tips
Use perfectly ripe pears. – For the best texture, choose pears that are ripe but still firm — too soft and they’ll fall apart during canning, too green and they won’t develop full flavor. Bartlett and Anjou the best varieties for canning.
Prevent browning – Always keep peeled and sliced pears in an ascorbic acid solution or use a fruit preserver. This keeps your pears looking fresh and bright even after canning.
Use hot jars – Try to fill hot syrup and hot fruit into hot jars. This reduces the risk of jar breakage and helps ensure a proper seal.
Get rid of bubbles – Removing trapped air bubbles before processing helps prevent siphoning (liquid loss) and ensures the correct headspace for a good seal. You can do this by simply running a butter knife around the inside of the jar against the glass.
Don’t overtighten lids – Screw bands should be fingertip-tight only. Overtightening can prevent air from escaping during processing, which can lead to sealing issues.
Allow jars to cool – Once processed, let jars sit for 12-24 hours without moving them. This allows the seals to set properly. After cooling, check the seals by pressing the center of each lid. It should be firm, slightly concave (popped inward), and should not flex or make a popping sound.
Label and date your jars – Always label your jars with the date canned. Home-canned pears are best enjoyed within a year for optimal flavor and texture.

Frequently Asked Questions
Properly sealed canned pears can be stored in a cool dry place for 12-18 months for maximum freshness.
If your jars don’t seal and the fruit and jars were prepared properly, they can be re-processed with new lids. You must use new lids. You can’t re-use lids after they have been through the processing process.
Yes, according to the Utah State University Extension for Canning Resources pears have a high enough acidity to can in a water bath.
More Canning Recipes
Ready to start canning your pears? 🍐Please let me know how it goes in the comments below!
Canned Pears Recipe
Ingredients
- 18 pounds Bartlett pears, (appx 30-36 medium-sized pears)
- 1 gallon water, (to keep pears from browning)
- 1 teaspoon ascorbic acid powder, (this is different from citric acid, see notes above)
- 8 cups water
- 4 cups granulated sugar
Instructions
- First, prepare and sanitize your jars (this recipe should yield 4-5 quart jars). If you are unsure how to do this, check out our Water Bath Canning Guide or read notes above.

- In a large bowl, prepare an ascorbic acid solution to prevent browning of the pears. Mix 1 gallon water to 1 level teaspoon of ascorbic acid powder (this is different from citric acid). You may need to double or triple the solution to fit all the pears. Alternatively, you can mix ½ gallon of water with 3 tablespoons of fresh fruit preserver that uses ascorbic acid as main ingredient.
- Wash and peel pears. Cut lengthwise in halves. Remove core by using a melon baller or spoon. Place in water ascorbic acid solution while working to keep the pears from browning.
- Prepare syrup by combining 8 cups water and 4 cups sugar together in a large stock pot. Bring to a boil. Drain fruit and add to the syrup. Bring to a boil and boil for 4-5 minutes.
- Fill jars with hot fruit and syrup leaving 1/2" headspace at the top of the jars. I like to use a slotted spoon and pack in the jar first and then spoon the syrup over the top. Do this one jar at a time and work quickly.
- Adjust lids and process. For water bath processing (recommended method), process quart jars for the following times and elevations: 0-1,000 feet = 25 min, 1,001-3,000 feet = 30 min, 3,001-6,000 feet = 35 min, 6,000+ feet = 40 min.If packing pints, process for 5 minutes less than the times/elevation suggested for quart jars.

Notes
Nutrition
Nutrition information is automatically calculated, so should only be used as an approximation.
Love this recipe?
We want to hear from you! Please leave a review.
I am wondering how long after picking the pears do you wait before canning them? I live in southern Idaho and just picked half the pears on my tree and I’m not sure how long to wait so they are not over or under ripe. How long do you usually wait?
I like to go by when they are the perfect ripeness for eating as a good measure.
Thank you for the recipe. We love the pears.love making and eating them.😋🥰
You are so welcome! It’s almost pear canning season, can’t wait!