We may earn a commission when you click on the affiliate links in this post.
Light, airy, and irresistibly cheesy, this Brazilian Cheese Bread (or Pão De Queijo) is easy to make at home with simple ingredients and always turns out delicious. These little bites are naturally gluten-free, freezer-friendly, crisp on the outside, and soft and chewy in the middle, just like the warm Brazilian cheese bread you get at a restaurant.

5 Star Reviews ⭐️⭐️⭐️⭐️⭐️
“Best recipe I’ve found. It’s delicious, crisp outside, soft inside and all-round incredible.” – TWNZMAMA2
“This is an amazing recipe! I tried to make Brazilian cheese bread for the first time and the balls turned out how I used to get them frozen from a store. The flavor, taste, and texture are exactly what I get from an expensive tiny bag at a store.” – Yana
“I’ve been making these for a long time and they are absolutely delicious! Want to add that they freeze and bake perfectly as though you just made the batter. Thanks again for sharing your recipe!” – Jenna
A Taste of Brazil at Home
I love this recipe because it brings a little taste of Brazil right into my kitchen. My husband went to Brazil back in the 90s and completely fell in love with these little Brazilian cheese bread bites. He talked about them all the time, but I had no idea what he meant until years later when we found them at Tucanos Brazilian Grill in Utah. The first time I tried one, I totally understood the hype. The smell was amazing, and that warm, cheesy, chewy bite was so good I had to stop myself from eating the whole basket.
Now I make this Brazilian Cheese Bread at home all the time, and it is always a hit with family and friends. I love that it feels special, but the ingredients are simple and the process is easy once you do it once.
I also love serving these with a full Brazilian-inspired meal. They pair so well with our Brazilian Rice and Beans and Brazilian Limeade.
I’m so excited for you to try them!
🩷 Erica
Table of Contents
- 5 Star Reviews ⭐️⭐️⭐️⭐️⭐️
- A Taste of Brazil at Home
- Why This Brazilian Cheese Bread Works
- Ingredients You’ll Need
- How to Make Brazilian Cheese Bread
- Quick Blender Method (optional):
- Recipe Tips
- Frequently Asked Questions
- Troubleshooting
- Make Ahead and Storage
- More Hot Bread Recipes
- Brazilian Cheese Bread Recipe
Why This Brazilian Cheese Bread Works
This recipe works because a few simple things come together the right way.
- Tapioca flour (tapioca starch) gives Brazilian cheese bread its signature chewy texture and helps the puffs rise.
- Heating the milk, oil, and salt before mixing in the tapioca flour helps create the right dough texture in the traditional method.
- Eggs and cheese give the dough structure, flavor, and that soft, stretchy interior.
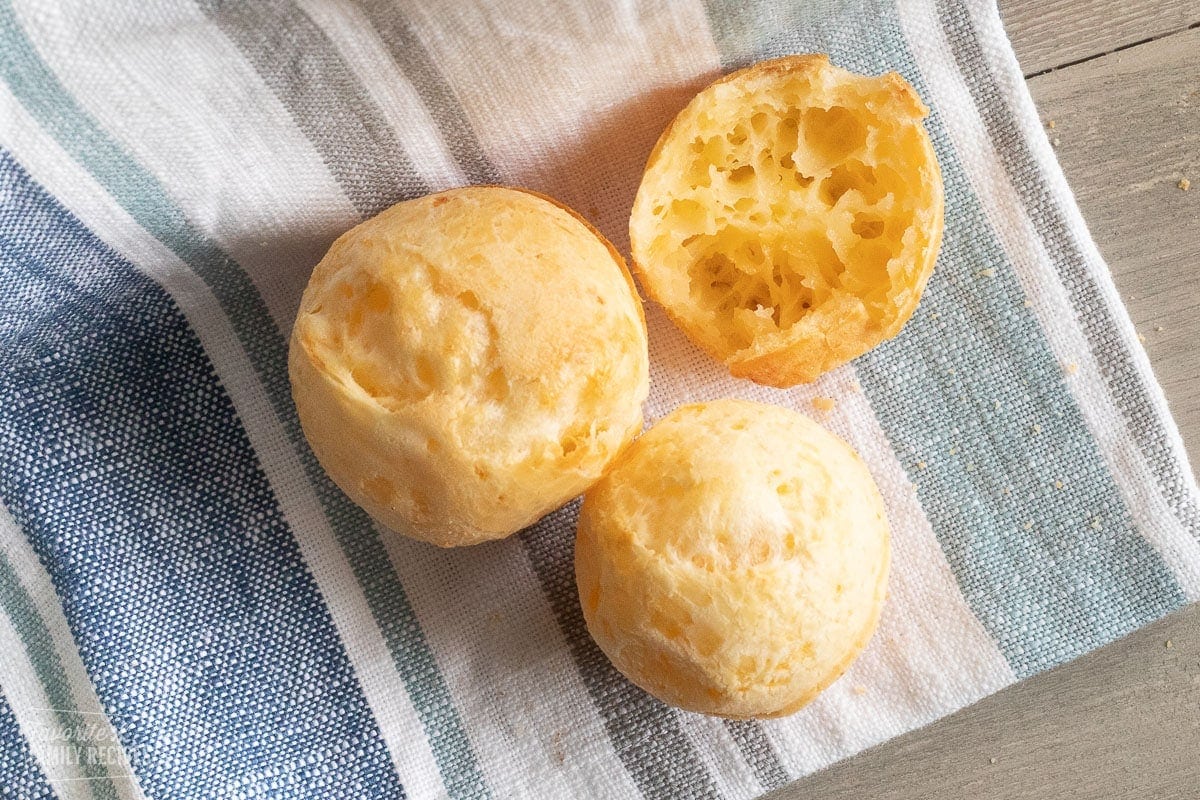
- Not overbaking keeps the centers chewy instead of dry. A soft, slightly gooey center is normal for Brazilian cheese bread. That texture is part of what makes it so good.
Ingredients You’ll Need

- Milk, oil, and salt – These are heated together to create the base and help build the dough texture.
- Tapioca flour (tapioca starch) – This is the key ingredient that makes Brazilian cheese bread chewy and naturally gluten-free.
- Eggs – Eggs help bind the dough and give the puffs structure as they bake.
- Parmesan and cheddar cheese – A mix of Parmesan and sharp or medium cheddar gives a bold, salty, cheesy flavor that works really well.
Ingredient Additions and Substitutions
- Cheese options – Try gouda, mozzarella, or gruyère for a different flavor twist.
- Tapioca flour types – You can use regular tapioca flour (tapioca starch). In Brazilian recipes, you may also see sour tapioca flour (polvilho azedo) and sweet tapioca flour (polvilho doce), which give slightly different flavor and chew.
- Milk – Whole milk gives the richest texture, but 2% milk can work if that is what you have.
- Oil – Vegetable oil is my go-to, but another neutral oil works too.
- More Parmesan – If you like a stronger, saltier flavor, you can increase the Parmesan slightly and reduce the cheddar a little.
- Milder flavor – Use medium cheddar instead of sharp cheddar for a less bold taste.
How to Make Brazilian Cheese Bread

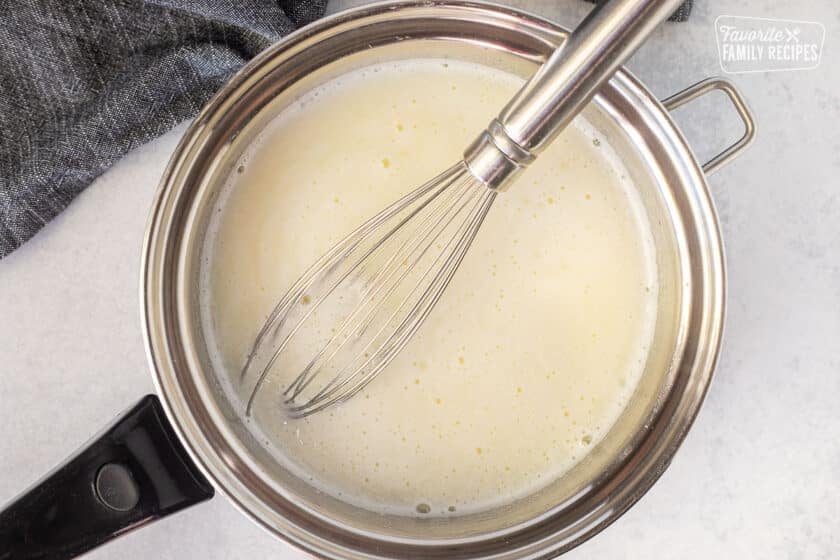
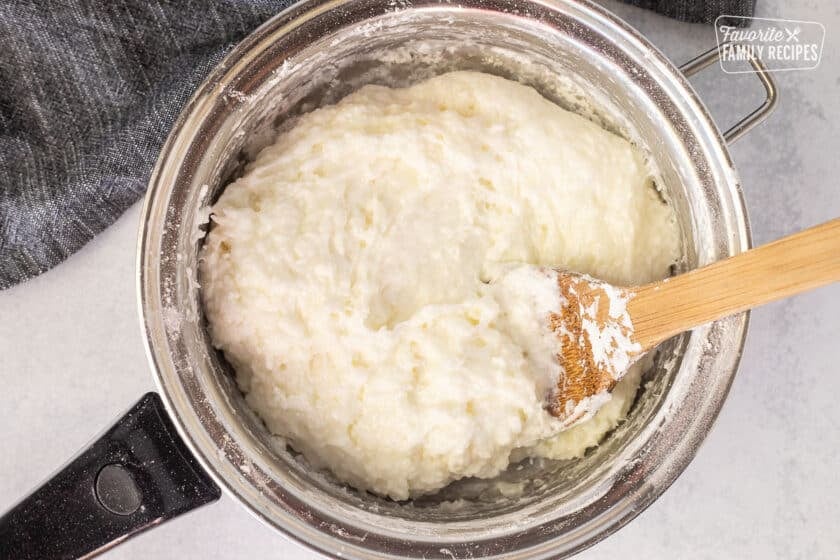
- In a saucepan, warm the milk, oil, and salt until it begins to simmer. Remove from heat.

- Gradually stir in tapioca flour until the dough becomes grainy and gelatinous.
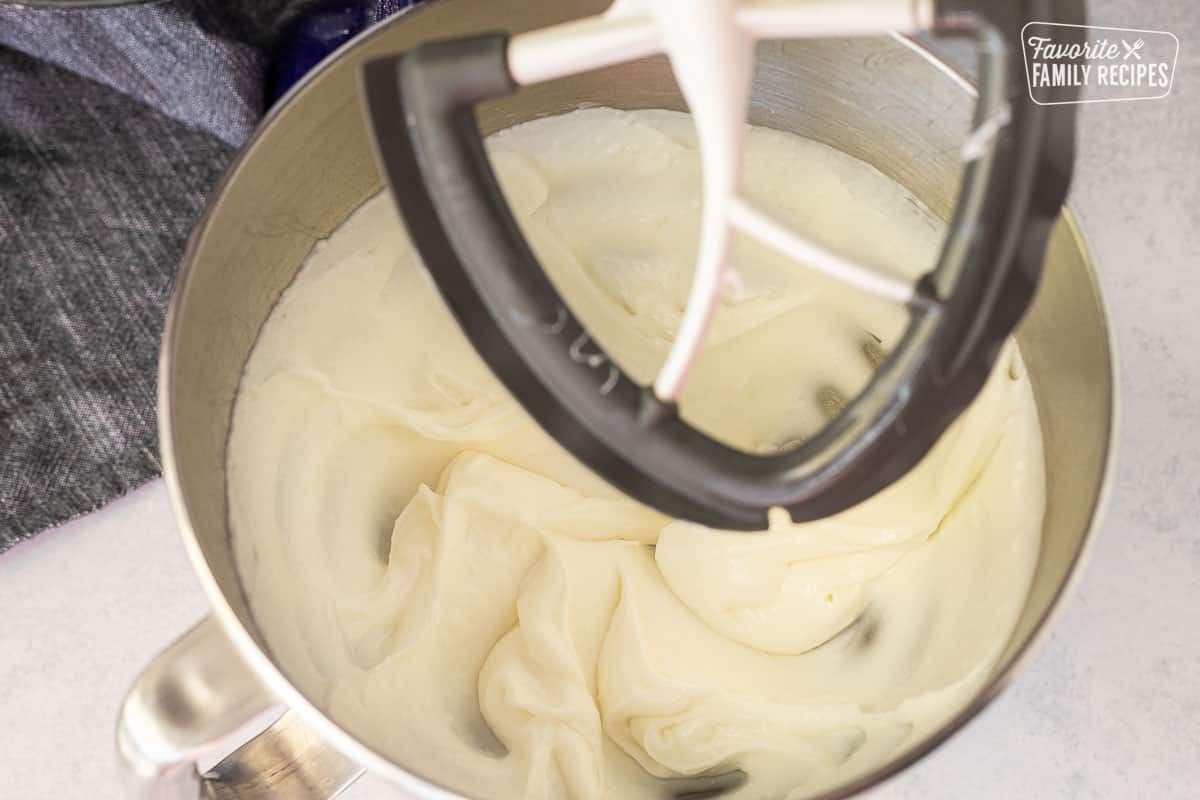
- Transfer to a stand mixer with a paddle attachment. Beat on medium speed until smooth and cooled slightly.

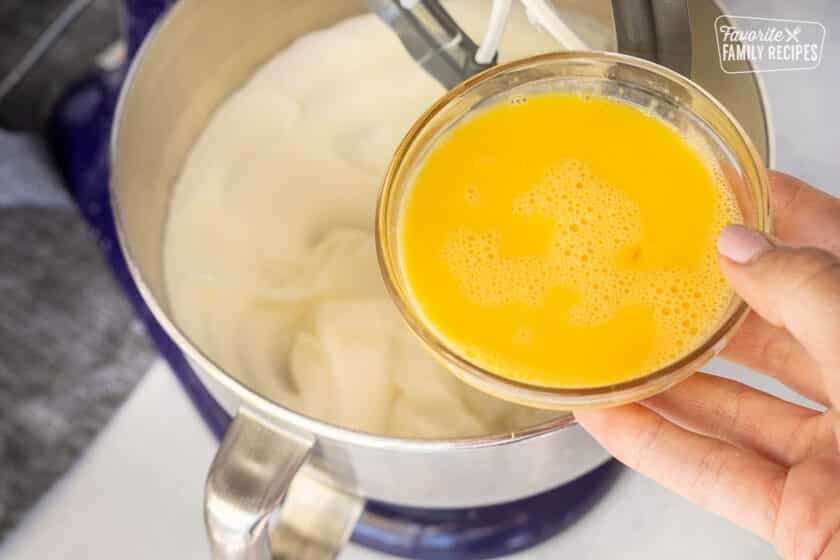
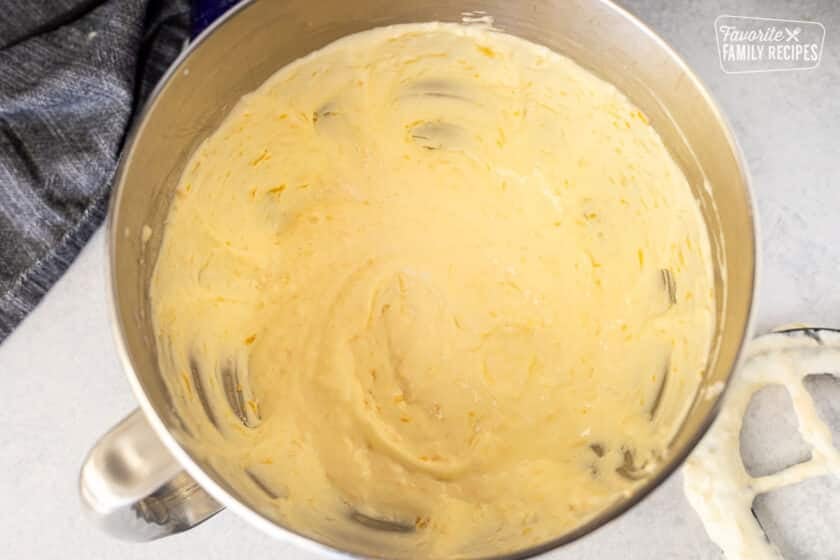
- Whisk the eggs separately. With the mixer running, add the eggs in two batches, letting each fully incorporate. Then mix in the cheese until the dough is sticky and stretchy.

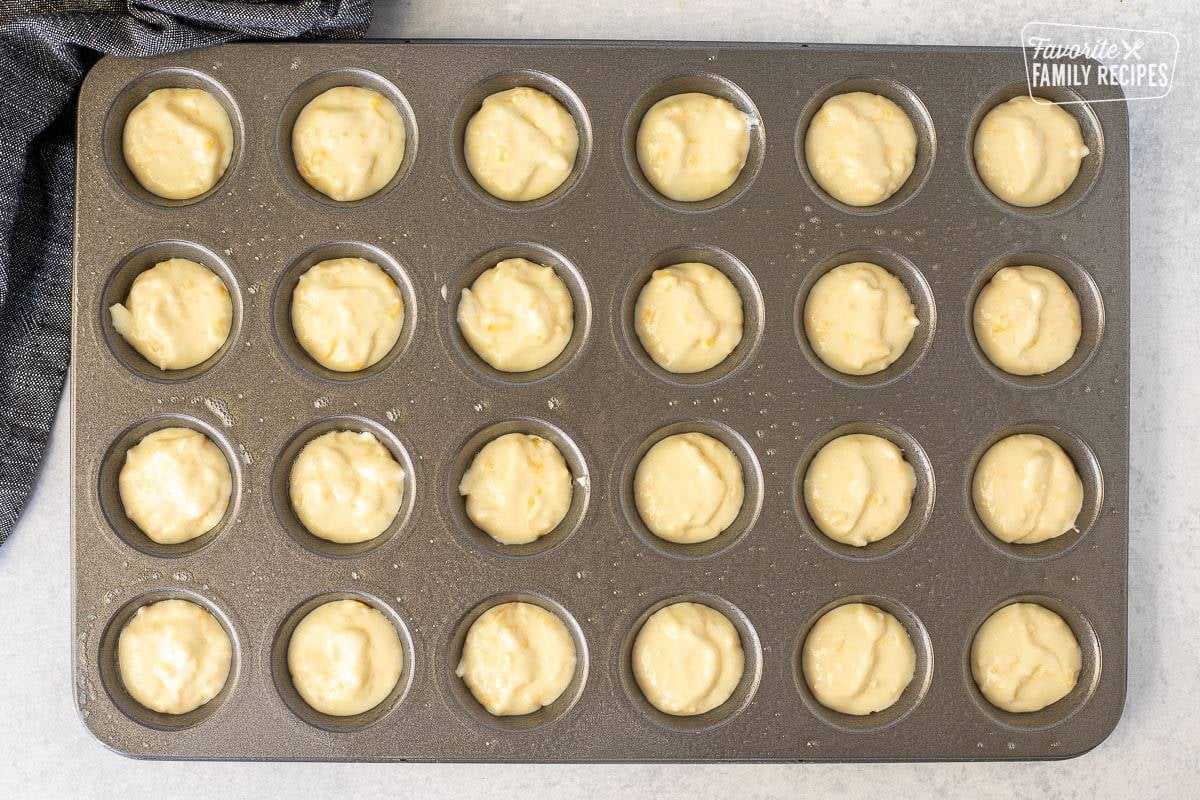
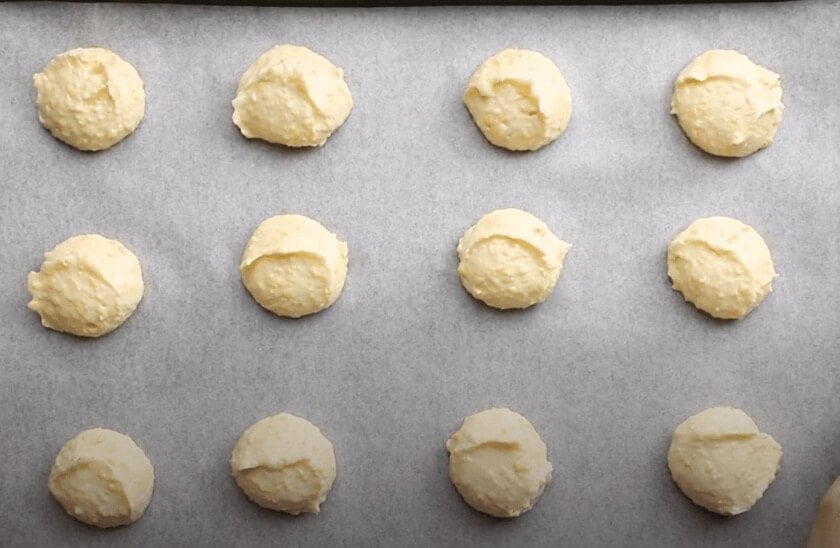
- Use a cookie scoop or spoon to form 1-2 inch balls.

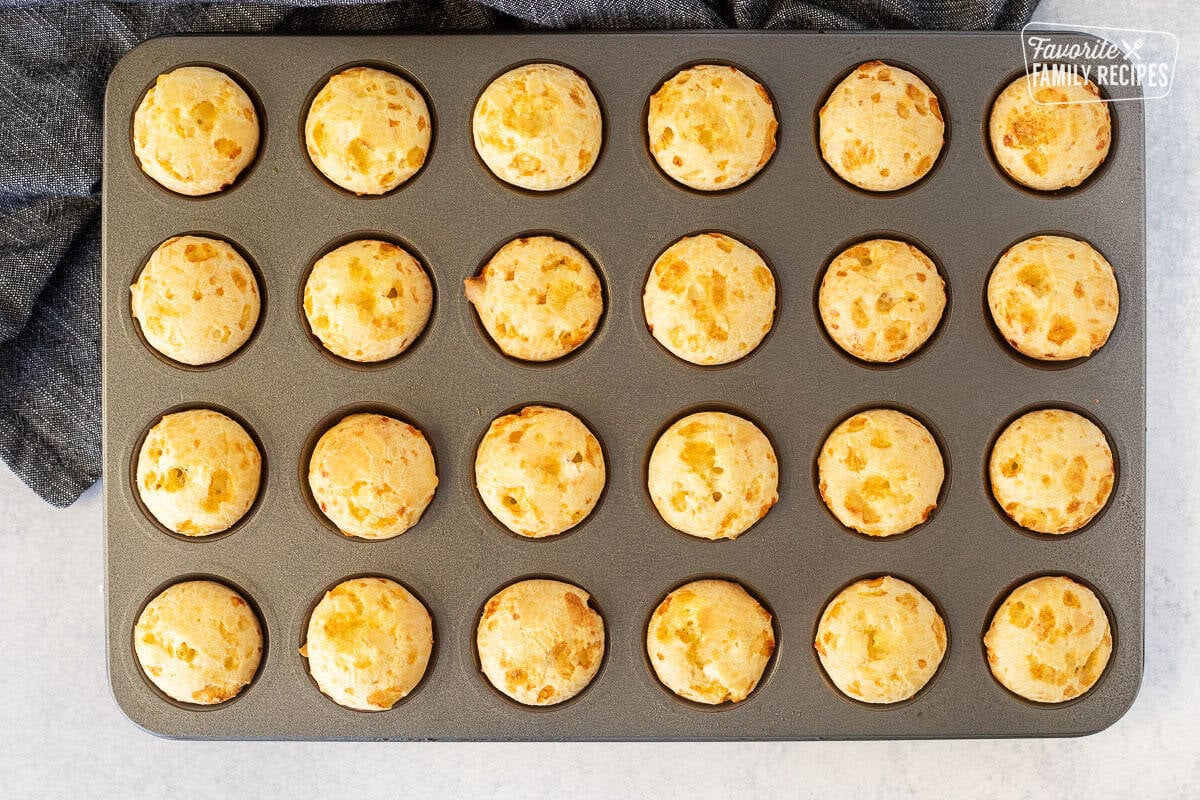
- Place on a parchment-lined baking sheet and bake for 25-28 minutes until puffed and golden.
Quick Blender Method (optional):
This is the best option when I want Brazilian cheese bread fast or I do not feel like pulling out the mixer.
- Fill and bake – Pour or spoon the batter into the mini muffin tin. Fill each cup about ¾ full to give them room to puff. Bake for 15 to 20 minutes, until puffed and lightly golden. Do not overbake.
- Preheat and prep the pan – Preheat oven to 400°F. Grease a mini muffin tin well.
- Blend the batter base – Add all ingredients except the cheese to a blender. Blend until smooth, about 20 seconds, scraping down the sides if needed.
- Add the cheese – Pulse in the cheese 3 to 4 times until evenly incorporated. Do not overblend once the cheese is added.
Blender Method Notes
- The batter is thinner than the traditional dough, so a mini muffin tin works best.
- If you use a regular muffin tin, they may spread more and need a few extra minutes.
- The outside texture is a little more bread-like, and the inside is still soft and chewy.

Recipe Tips
- Use tapioca flour, not cassava flour – They are not exactly the same, and tapioca flour gives the best texture for this recipe.
- Shred your own cheese – Freshly shredded cheese melts better and gives better flavor.
- Expect sticky dough – The dough should be soft, stretchy, and sticky, somewhere between cookie dough and thick batter.
- Use a cookie scoop – This makes portioning easier and keeps the cheese breads more even in size.
- Wet or spray your scoop – This helps prevent the dough from sticking.
- Do not overbake – Bake just until puffed and lightly golden so the center stays chewy.
- A slightly gooey center is normal – That chewy, soft middle is part of what makes Brazilian cheese bread so good.
Frequently Asked Questions
Brazilian Cheese Bread, also called pão de queijo, is a traditional Brazilian cheese bread made with tapioca flour instead of wheat flour. That is what gives it its chewy texture. It is naturally gluten-free and does not require yeast.
It is commonly pronounced “pow duh kay-zhu” (you may also hear slightly different pronunciations depending on accent).
Yes! That gooey center is part of the charm. Tapioca flour naturally creates a chewy texture even when fully cooked.
That’s totally normal! The dough should be soft, stretchy, and sticky—somewhere between cake batter and cookie dough. Use a cookie scoop sprayed with cooking spray or dipped in water to make portioning easier.
Yes. The blender method is a great shortcut, especially when using a mini muffin tin. It is quick, easy, and perfect for busy days.
Troubleshooting
- Why did my Brazilian Cheese Bread turn out flat? Usually the dough or batter was too runny. Use tapioca flour, measure carefully, and use a mini muffin tin for the blender method.
- Why are they dense instead of airy? This can happen from too much flour, uneven mixing, or overmixing. Measure carefully and mix just until combined.
- Why did they deflate after baking? A little settling is normal. Big deflating can happen if they were underbaked or the batter was too thin.
- Why did they stick to the pan? Grease the pan well, especially for the blender method, and let them cool briefly before removing.

Make Ahead and Storage
This Brazilian Cheese Bread is best served warm, but it stores and freezes really well.
- Room temperature – Store in an airtight container for 1 to 2 days
- Refrigerator – Store in an airtight container for up to 3 days
- Freezer (baked) – Freeze in a freezer-safe bag or container for up to 2 months
- Freezer (unbaked batter) – Scoop into silicone molds or portion onto a tray, freeze, then bake from frozen with a few extra minutes added
Reheating Tips
- Microwave – Heat 1 to 2 rolls for 10 to 15 seconds (they will be softer and less crisp)
- Oven (350°F) – Reheat for 5 to 8 minutes until warmed through and lightly crisp
- Air fryer – Reheat for 1 to 2 minutes
More Hot Bread Recipes

- Pani Popo (Samoan Coconut Rolls)
- Mom’s Homemade Rolls
- Easy Monkey Bread
- Irish Soda Bread
- Rosemary Garlic Focaccia Bread
This Brazilian Cheese Bread recipe is one of my favorite breads to make when I want something warm, cheesy, and a little special without a lot of fuss. It is simple, naturally gluten-free. I’d love to hear what you think! Drop a comment below and let me know how it turned out. 💛
Brazilian Cheese Bread

Video
Ingredients
- 1 cup whole milk
- 1/2 cup vegetable oil
- 1 teaspoon salt
- 2 cups tapioca flour , (I use Bob's Red Mill in the gluten-free section of the grocery store)
- 2 eggs
- 3/4 cup Parmesan cheese, (freshly hand shredded)
- 3/4 cup sharp or medium cheddar cheese, (freshly hand shredded)
Instructions
- Preheat oven to 350 degrees.Combine the milk, oil, and salt in the saucepan, and whisking occasionally, bring it to a gentle boil over medium heat. Remove from heat as soon as you see big bubbles coming through the milk.
- Add all of the tapioca flour to the saucepan and stir until you see no more dry tapioca flour. The dough will be grainy and gelatinous at this point.
- Transfer the dough to the bowl of a standing mixer fitted with a paddle attachment. (Alternatively, you can do the next few steps by hand. Be prepared for a work-out.) Beat the dough for a few minutes at medium speed until it smooths out and has cooled enough that you can hold your finger against the dough for several seconds.

- Whisk the eggs together in a small bowl. With the mixer on medium, beat the eggs into the dough in two additions. Wait until the first addition has been fully incorporated into the dough before adding the second. Scrape down the sides of the bowl as needed.
- With the mixer on medium, beat in the cheese until fully incorporated. The resulting dough will be very sticky, stretchy, and soft with a consistency between cake batter and cookie dough.
- Using a cookie scoop, a tablespoon measure, or a dinner spoon, scoop rounded portions of the dough into mounds on the parchment-lined baking sheet.
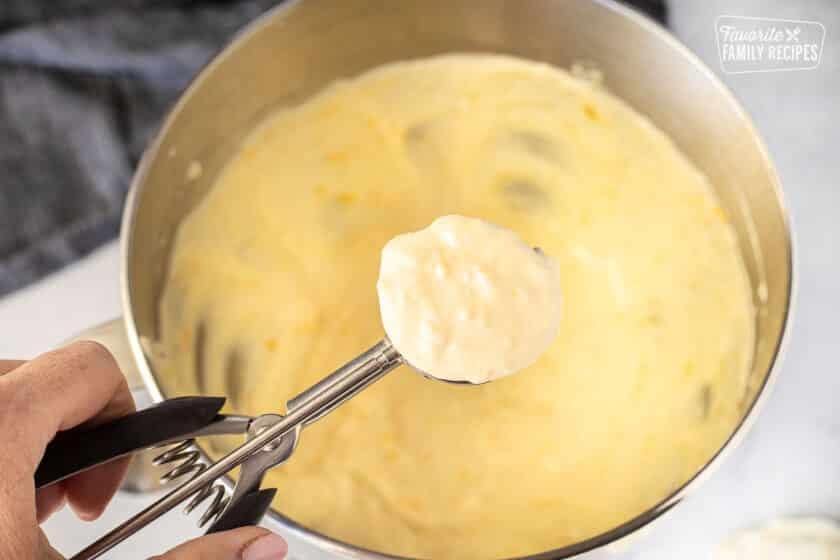
- Space the mounds an inch or two apart. Dip your scoop in water or spray with cooking spray to prevent sticking.
- Transfer the sheet with the puffs to the oven and bake for 25-28 minutes, until the puffs have puffed, the outsides are dry, and they are JUST starting to color. Do not over bake! Cool briefly and eat.

Notes
- Use tapioca flour (tapioca starch), not cassava flour.
- Freshly shredded cheese melts better and gives the best flavor.
- Dough should be sticky and stretchy, this is normal.
- A cookie scoop dipped in water or sprayed with nonstick spray makes portioning easier.
- Do not over-bake or the centers can lose their chewy texture.
- A soft, slightly gooey center is normal and expected.
- Traditional method bakes at 350°F on a sheet pan.
- Quick blender method bakes at 400°F in a mini muffin tin.
- Store leftovers airtight at room temp for 1 to 2 days, in the fridge up to 3 days, or freeze up to 2 months.
- Reheat in the oven or air fryer for the best texture.
Nutrition
Nutrition information is automatically calculated, so should only be used as an approximation.
Love this recipe?
We want to hear from you! Please leave a review.
Is the temperature without fan? I did 350 fan and it got a lot of color after 16 mins, I had to take it out but it turned out underbaked 🙁
My oven doesn’t have a fan – maybe try putting some tin foil over the top?
Having tried the other blender-style recipes, I found this recipe one to be just like what I’ve had at the Brazilian Steakhouses! It is basically a pate Choux made with Tapioca Flour. It was easy to put together; a little messy to portion out even with keeping the scoop oiled, but, hey, the end results are well worth it! The flavor and texture are superior! I’m hosting a ladies luncheon next week and I’ll be making more for that. I know that none of them have ever had these and they will be a tasty treat to accompany our meal!
I cut the recipe in half because I only had 1 cup of tapioca flour left. Mixed the ingredients with a whisk in mixing bowl, stirred in Parmesan and cheddar, baked as directed. They came out perfect. They are so good.
Finally. This is the recipe I’ve been looking for. And hand grating the cheese makes a surprisingly big difference. Thank you for the recipe. Caution though— these things are addictive!
These did come out tasting really good. Similar to a few other commenters, my batter turned out so soft it didn’t really hold its shape. When I did a test batch, my mounds of batter turned into flat, cheesy cookies in the oven. Adding more starch was helpful, though I found I needed to add quite a bit more — I used probably almost double what the recipe calls for. I am at high altitude (in Colorado) so that could be why, and it seems like a lot of other people have made this recipe with success, so maybe it’s just an issue of where I live!
Hi there
I just made these and mine turned out crispy on the outside but really gummy on the inside and not hollow at all. What did I do wrong …please suggest?
Could be an elevation issue. Do you live at a high elevation?
Why are mine hollow in the middle?
They are supposed to be hollow in the middle!
Didn’t realize that using the blender method these would be liquid. So, not having a muffin tin I just poured the batter into an 8×8 baking pan. No rolls of course but a beautifully bubbly delicious bread. Well not really bread. More like gushy cheesey pastry. Who cares? It’s low fodmap and oh so yummy. Used Gruyère instead of cheddar!
Hi, I made a batch of rolls last week and they were perfect. An absolute hit with the family. Today I made them again and had an issue were the mixture split and the oil started to separate from the milk and tapioca flour. Any ideas as to were I went wrong?
Many Thanks
Wendy
I am not sure why that happened, but I have seen some recipes that suggest adding another egg to the batter as a cure for breaking!
Hi Wendy, this happened to me initially as well, (I was using a stand mixer), so I stopped mixing and manually broke up the chunks of the starchy flour + milk mixture and then it was able to combine.
Eureka! After testing so many recipes off the internet that all turned out to be a dud, I have finally been rewarded with the best pao de queijo recipe ever. My son is obsessed with brazi bites but they are not always available the market and they’ve gotten quite expensive. I also prefer to make my own so I can use organic cheese and eggs and avocado oil. This is it!!! I would add more cheddar and less Parmesan instead of equal amounts so the flavor is less sharp. But overall… this recipe is a winner. Thank you for sharing.
Please note gluten does not come from yeast but from the grain used.
Good point. People are so easily
easily confused it’s amazing. There are people right now wondering if only Brazilians can eat these rolls or maybe Brazilian tourists!
“Is it okay for me to eat Brazilian Cheese Rolls in Canada? I don’t have Celiac.
My husband and I loved snacking on brazi bites (which came frozen ) this recipe looks so good! I wonder if I can freeze these and cook them later ? So that way I’ll always have some ready to eat if I make them ahead of time ?
Yes, you could definitely freeze them.
Hello. Can I omit the cheese altogether? I cannot have dairy.
The cheese is what makes up the texture, so it won’t work if the cheese is left out. Sorry!
I am dairy free also and I plan on using dairy free cheeses!
Is it okay to use a mixed Mexican cheese pack (jack, queso, cheddar) to substitute the two cheeses you have?
We haven’t tried it with other cheeses, but I think it would be okay!
Try with vegan cheese!
What is the serving size? Are there 9 carbs per 2 inch roll? Also, does it have to be vegetable oil? Would olive, avocado, or grapeseed oil work?
Yes, the serving size for the nutrition facts is 1 roll. We haven’t used any other kind of oil, so I can’t say if those would work.
Can you use a nut or coconut milk with this recipe?
We haven’t tried any milk substitutes with this recipe yet, but let us know how it goes if you do try it!
Well I tried this recipe for my first attempt at Pao de Queijo and they turned out pretty great! Beautiful texture! I have no idea how other commenters are saying theirs came out runny. In step 4 my dough didn’t really ‘smooth out’ until I added the eggs though. I would recommend adding a sprinkle of garlic salt on top before you pop them in the oven. Delicious, thanks!
Hi. Your recipe looks delicious especially as I am a cheese lover. I have a pack of cassava flour in my pantry. Both tapioca flour and cassava flour are from the cassava plant but there is a slight difference I think. Any advice?
I haven’t used cassava flour, but from what I can find online, you should be able to substitute it!
Can I make the dough in the morning and portion and cook later?
It will taste better if made fresh. Thanks for asking!
I love Brazilian Cheese bread and yours was so good! My whole family loved them and have already asked me to make them again. Your directions were so easy to follow..Thanks so much!
This recipe needs to come with a disclaimer warning everyone that you will want to eat every last one of these, haha! Seriously, they’re amazing!!
My husband spent time in Brazil and LOVED this snack. He approves of your version of this recipe!! SO good and SO easy to make. Thank you!
This cheese bread recipe is a family favorite! So easy to make and buns are so soft and fluffy!