This post may contain affiliate links. See our disclosure policy.
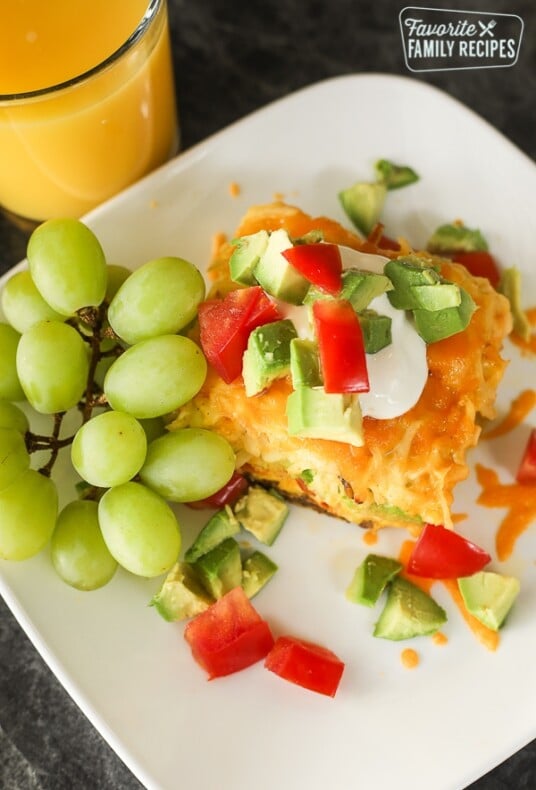
Omelette in a Bag is a perfect breakfast for camping, family reunions, or at even home. Everyone can customize their own with their favorite ingredients. And clean-up is a breeze!

Featured with this Recipe
This Omelet in a Bag recipe is so much fun! We make these every single time we go camping. They are SO easy and there is virtually no cleanup. I have all the ingredients prepped before we go camping so we simply wake up and get some water boiling – that’s it. Everyone loves making their omelettes EXACTLY how they want and it is fun! They always come out perfect and nothing tastes better after a long night of camping. I actually find myself making these a few times just at home throughout the year because they turn out so fluffy and tasty. They are way better than trying to do it in a pan, plus you can make them all at once instead of just one-at-a-time. We have made these when guests come visit and they are always surprised with how good they are.
Ingredients in Omelette in a Bag
- Eggs
- Water
- Fillings – see our list below for all our favorite filling ideas!
- Toppings – shredded cheese, avocado, sour cream, salsa, ketchup, hot sauce, sliced green onions, chives, salt and pepper
Omelettes for a Crowd
This Omelette in a Bag recipe is a great recipe if you are cooking breakfast for a crowd. You can make big batches all at once and again, clean-up is a snap! Whether camping, at a reunion, or just at home wanting to switch things up, you just can’t lose with this simple, satisfying and super fun breakfast! Also, have you seen our FAMILY REUNION Meal Planning Guide? We share lots of other great meals you can make for big groups. Be sure to check it out!
Steps to the Perfect Omelette in a Bag
Here are the step by step instructions for making an Omelette in a Bag. It really is so easy!

Omelette Fillings and Toppings
The sky is the limit when it comes to omelette in a bag fillings. Here are some of the more common types of Omelette recipes with fillings.
- Denver Omelette – ham, bacon, bell peppers, onions, cheese.
- Western Omelette – ham, onion, green pepper, cheese.
- Mediterranean Omelette – spinach, feta cheese, olives, red onion, garlic.
- Southwest Omelette – bacon, tomato, avocado, Monterey Jack cheese, salsa, sour cream.
- Steak Omelette – sliced steak, mushrooms, onions, green pepper, tomatoes.
- Veggie Omelette – bell peppers, onion, mushrooms, baby spinach leaves, tomato, avocado, cheese.
- Meat filling ideas: Diced ham, bacon, ground sausage, Kielbasa sausage, steak slices, Spam, pulled pork, seasoned ground beef, pepperoni, salami, shredded chicken.
- Vegetable filling ideas: Red, green, orange, or yellow bell peppers, mushrooms, red onion, green onion, white onion, cherry tomatoes, Roma tomatoes, any garden tomato, fresh spinach, diced zucchini, broccoli, avocado, butternut squash, alfalfa sprouts.
- Cheese filling ideas: Cheddar cheese, Monterey Jack cheese, Provolone, Pepper Jack, Swiss, Gruyere, Mozzarella.
- Topping ideas: Shredded cheese, salsa, sour cream, guacamole, cilantro, parsley, diced tomatoes, diced onions, basil leaves, lime, Hollandaise sauce, Greek yogurt

BPA Free Plastic Bags
We have had some comments about the bags being safe to boil. We use Ziploc freezer bags which claim to be BPA free. If you are still worried about it, there are reusable boiling bags that you can purchase online as well. We have no qualms using the Ziploc freezer bags, especially since we only make these on special occasions.

Frequently Asked Questions
Yes, they are safe! Ziploc bags are BPA free and can be heated without issue. We make these all the time for ourselves and our kids.
We’ve found that 13 minutes works for up to 6 eggs. If adding more eggs, add 1-2 minutes per additional eggs. ALSO, cooking times vary depending on elevation – check your eggs every few minutes. Once they are no longer runny and feel like they are set, they are ready!
You can spray a little cooking spray in the bag before filling.
READ NEXT: 33+ Breakfast Ideas
More Tasty Breakfast Recipes
From sweet to savory, we have dozens of delicious breakfast recipes right here! Check out a few of our favorites:


How to Make an Omelette in a Bag

Omelette in a Bag
Video
Ingredients
additional ingredients (to your liking):
- bacon cooked & chopped
- sausage cooked & crumbled
- tomato diced
- bell peppers diced
- onion chopped
- mushroom sliced
- whatever other toppings you like
Optional Toppings:
- Salt & pepper
- sour cream
- salsa
- avocado
- guacamole
- any additional topping ingredients you like
Instructions
- Bring a large pot of water to a boil (approximately ⅔ full)
- While waiting for the water to boil, crack eggs into a Ziploc heavy-duty, large (at least quart-sized) freezer bag and add water.
- Seal and shake, smash, squish the bag – whatever you can to get those eggs really beaten up.
- Add any remaining ingredients that you would like, press as much air out of the bag as you can, and seal tightly.
- Smoosh the ingredients around a little bit to get an even distribution.
- Place bags (up to 6) in the boiling water and cook for 13 minutes (adding 1-2 minutes per additional egg if people want bigger omelettes).
- Also, cooking times vary depending on elevation – check your eggs every few minutes. Once they are no longer runny and feel like they are set, they are ready!
- Make sure the tops of the bag don't hang out over the edge of the pot, especially if you are doing it over a fire– you don't want the plastic to melt.
- One of our readers suggested clipping the bags together with a clothespin and draping them over a skewer or stick placed across the pot to keep them from falling over the sides– a great idea!
- Carefully remove the bags from the water. When you open the bag, the omelette should easily slide onto the plate.
- Top with any additional toppings and enjoy!
Notes
-
- Meat filling ideas: Diced ham, bacon, ground sausage, Kielbasa sausage, steak slices, Spam, pulled pork, seasoned ground beef, pepperoni, salami, shredded chicken.
-
- Vegetable filling ideas: Red, green, orange, or yellow bell peppers, mushrooms, red onion, green onion, white onion, cherry tomatoes, Roma tomatoes, garden tomato, fresh spinach, diced zucchini, broccoli, avocado, butternut squash, alfalfa sprouts.
-
- Cheese filling ideas: Cheddar cheese, Monterey Jack cheese, Provolone, Pepper Jack, Swiss, Gruyere, Mozzarella.
-
- Topping ideas: Shredded cheese, salsa, sour cream, guacamole, cilantro, parsley, diced tomatoes, diced onions, basil leaves, lime, Hollandaise sauce, Greek yogurt
So excited to try tonight for breakfast for dinner!
I love this recipe. I make it when I have groups staying overnight. Just before they all head to bed we do the assembly thing and I then store all the bags together (more or less standing up) in the pan I will use to boil them. First thing in the morning I add water to the pan and count the minutes from when the water actually begins to boil. As people drift into the kitchen they pull out “their” bag and eat. Tortillas make a nice addition … egg burritos!
Can you make these in the microwave too? Curious if anyone has tried it that way. Almost sure I’ve heard of this same thing being done in the microwave.
Try it people!! We have been doing this for years!! When you have a big crowd it’s perfect!! We normally get a couple pots boiling so we can feed more people at once. It’s a great way to feed picky eaters; they can personalize their eggs. We use liquid egg versus actual eggs, just for the ease. 1/3 cup liquid egg is equal to 2 eggs.
Happy cooking!!
You could also buy some no-crack eggs that come in the carton(: works wonders for camping!
Hi! I think this is a great idea. I do have a question though… Do you need to hold on to the tops of the bags while they are boiling? Or can you just plop the whole thing in? or do they just sit with the top of the bag upright and out of the water? I was a little confused on that part. *also, I’ve written down several of your recipes, I believe… and they are great! thanks! 🙂
You don’t need to hold the bags… just check on them to make sure the bag tops don’t hang over the outer edge of the pot and melt.
If doing multiple bags you could clip the tops together with a clothespin and drape a skewer across the top of the pot to clip it to. Haven’t tried it yet but I don’t see why it wouldn’t work.
That is actually a REALLY good idea. I am definitely trying that next time!!!
could you do these ahead and freeze um? i don’t see why not but would like more imput thanks
I haven’t tried that, let me know if it works!
I’m curious about freezing them as well. I love making freezer meals ahead of time, and this would be a great breakfast option!
Wonderful blog! Do you have any tips for aspiring writers?
I’m planning to start my own blog soon but I’m a little lost on everything.
Would you advise starting with a free platform like WordPress or go for a paid option?
There are so many choices out there that I’m completely overwhelmed .. Any ideas? Cheers!
Our friends over at Six Sister’s Stuff wrote a great e-book about starting your own blog, and they actually hold a conference each year about it. I would say that is a really great place to start!
How far in advance can you assemble everything in the bag? I’d like to have it all prepped in each bag ready to go in the cooler possibly a day in advance! Thanks for sharing : )
Hmm.. that’s a good question. I would imagine it would be fine but I can’t say for sure. If you do it let us know how it turns out!
Melissa, I have done this so many times for camp that it really is so easy. My only thought about prepping it the day before is that eggs have a shell to keep them nice and fresh. The minute you break that shell they start to go bad. Even in the fridge, they have the risk of going bad quickly. Personally I wouldn’t risk it, especially because prepping these while camping is so easy.
I tried this over the weekend and I used ziplock freezer bags and the eggs stuck to the sides of the bags. What did I do wrong?
You may have not let it boil long enough. I have never had that happen before so I can’t say for sure!
Hi! I just finally got around to trying these tonight. I did 3 eggs in each bag so I added an extra half tablespoon of water. I used gallon sized freezer bags that came from Dollar Tree (they didn’t say Do Not Boil like some of the other bags I had). I folded the bags together some & secured with a metal paperclip. I used a wooden spoon to drape the bags over the pot to make sure they didn’t melt to the side. My pot was deep with lots of water to make sure they didn’t touch the bottom. I boiled all 3 bags together for about 20 minutes checking them at the 15 minute mark. Worked perfectly! Slides right out of the bag onto the plate! Easy, fast, & yummy! Make sure what you are seeing is actually runny egg & not the egg crusting. Like she said, time may vary. This is not something I would leave unattended just in case the bags you are using do begin to melt 🙂
So glad you liked them!!! It is always our go-to breakfast when we go camping because clean-up is the easiest! Thanks for your nice comment! 🙂
These look great! The bags really don’t leak?? I worry that if I planned this for our camping breakfast, that we would end up with watery eggs in baggies and no breakfast. I love the idea so I hope it works!!!
People worried try at home first in pot it works
Going to try this tonight for dinner, it sure looks yummie!!
I did my omelette this way this morning, very easy. Cannot wait until my next camping trip, so that i can do a easy and not so messy breakfast.
my dad had mentioned doing this at an upcoming reunion and i happen to be in charge of one of the breakfasts. i was so excited to see this a couple of days after we’d talked and guess what i made that night? ha ha. easy and delicious! thanks so much!
Do you think this could also work in thinner Tupperware/Rubbermaid containers since people are so worried about the plastic melting?
hmmm.. I don’t know if I would try that. I would just be afraid that it would leak. If you get a leak it will get ruined real quick.
We use to make these when we went camping with the cubscouts. Since there was so many people they added all the eggs and mixed them in a pot then put a scoop in each campers ziplock bag. The scouts would use sharpie markers to write their names on the bags too. It was so much fun even the pickiest eaters liked it. No one ever got sick and we never had issues with the bags melting.
Love the idea!!! Can NOT wait too try it!!!
This is neat! I can’t wait to try.
OMG, get over it ppl what about your water bottles and everything else you reuse, and the MSG, and MGO, and all the other things in your food!!!! put there by the Government!! I had one this morning just to try it before company this morning and no melting of the bag and it really did taste very good….. Thanks for the share and remember you will always find someone who complains!!
Karen— THANK YOU 🙂
Love this for camping or any busy morning.
It’s not about complaining, it’s not about ‘getting over it’. It’s making sure that people are aware that this is bad for you so that they can make their own decision on whether they want to risk it. You really shouldn’t heat up plastic and eat from it. It’s not safe. It’s a fact that you can get cancer from too much BPA. BPA is banned in many other countries.
So get bpa free bags.. or dont even comment if you just want to complain.
You are absolutely right, Karen! No matter what we do, someone will have something to complain about! There will always be those complainers out there with nothing better to do. These omelets in a bag are awesome, & easy, especially while camping! Everyone, please chill & enjoy life!
Of course we are already getting emails about whether this is safe or not…. Ziploc’s website mentions that there could be an issue with the bags melting if they get over the sides so they don’t recommend boiling in them, HOWEVER, I have done this MANY MANY times and have never had a bag melt once. As far as “toxins” go… some threads are all hysterical but most places I have looked say it is totally fine. We have made these a bunch of times and no one has ever gotten ill. I figure if Ziploc bags are safe to microwave in, there isn’t much risk in boiling them. If you are REALLY REALLY concerned about it and can’t get past it, of course you can google “boilable bags” and there are lots of options that will come up.
my omelet came out really runny 🙁
I have been making these for years. Love them! The 12 -13 minutes is not totally set in stone. If it is runny, you just need to cook it longer. Before opening the bag, remove it from the water and press the eggs. If there is still liquid egg, cook it a few minutes more.
just tried it for the first time… ran out of ziplock sandwich bags, so i used a freezer bag.. good thing i did, cause it melted to the bottom of the pan. lost most of an egg before the egg clogged the holes in the bag. couldn’t bear to waste it, so i finished cooking it and tried it. it wasnt bad. i just hope i didnt ruin my pan..
Can these be frozen and then cooked at a later time?
Possibly, but I don’t know if we would recommend it. I think you risk contamination and possibly food borne issues by mixing all the ingredients first and then freezing and thawing again. Honestly, it is probably easiest (and safest) to make them fresh. Hope this helps!
Why in the world would you 2 eggs in a GALLON SIZE ZIPLOCK is way beyond me!
Hi. The toxic part is the build up in your system, of the phytochemical that are definitely kicked out from plastics. That is hy drinking out of plastic bottles is not a great idea. Short term great. But its a leading cause of cancers, and autoimmune illnesses. Worth thinking about. The omelet looks delicious.
https://ziploc.com/en/sustainability-and-safety
John and Johnson says ziplock bags are BPA free?
It appears that they definitely claim that they are BPA free– good to know! Thanks for posting this link!
We whisk the eggs well in a small bowl, then pour into the freezer bag. It’s only 2 more objects to wash and the omelets come out a lot fluffier. We also like to make these the morning after tacos in a bag for supper. We use up any leftovers for our omelets.
Thank you for the tip!
I use freezer bags, they’re stronger and don’t melt or shrink
We make these at Girl Guide camp. It’s important to use the freezer ziplocks or reusable silicone bags. Also, we’ve found cheese can melt the bags, so it helps not to put cheese in the bags – just add it when you take the eggs off the heat. Finally, we love popping the eggs in a whole west pita bread to save on dishwashing and add healthy carbs.
Oh I love the idea of putting it in a pita! That is genius! I also love your idea of using the reusable silicone bags. Thanks so much for sharing!