We may earn a commission when you click on the affiliate links in this post.
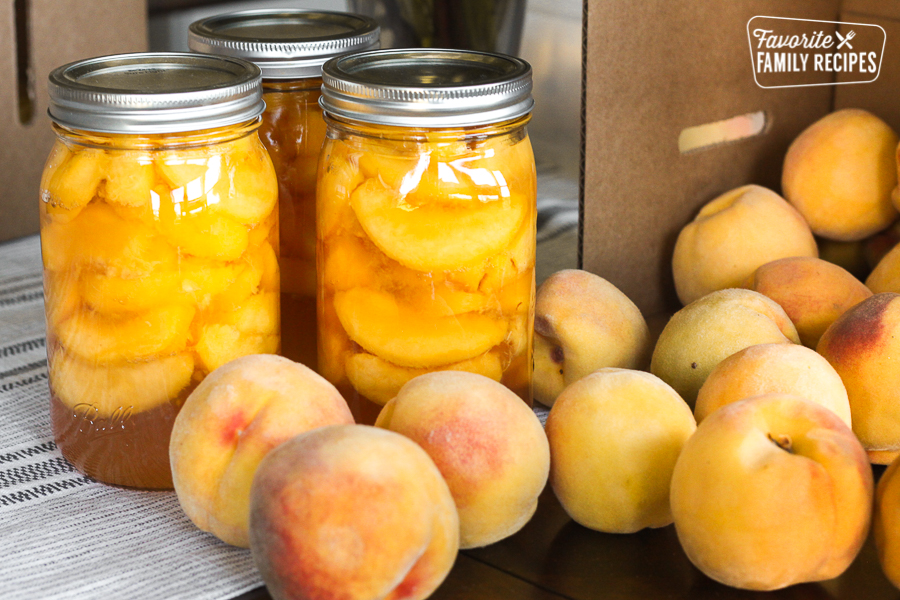
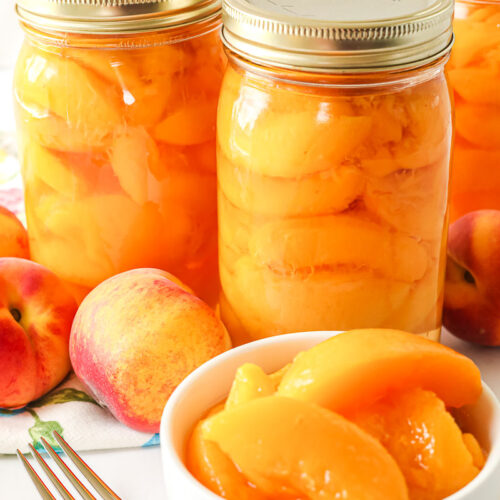
Canned peaches are easier to make than you think! Our mom’s beginner-friendly recipe walks you through every step. You’ll be stocking your shelves with juicy, homemade peaches in no time and enjoying them all year long!
 for canning peaches at home.")
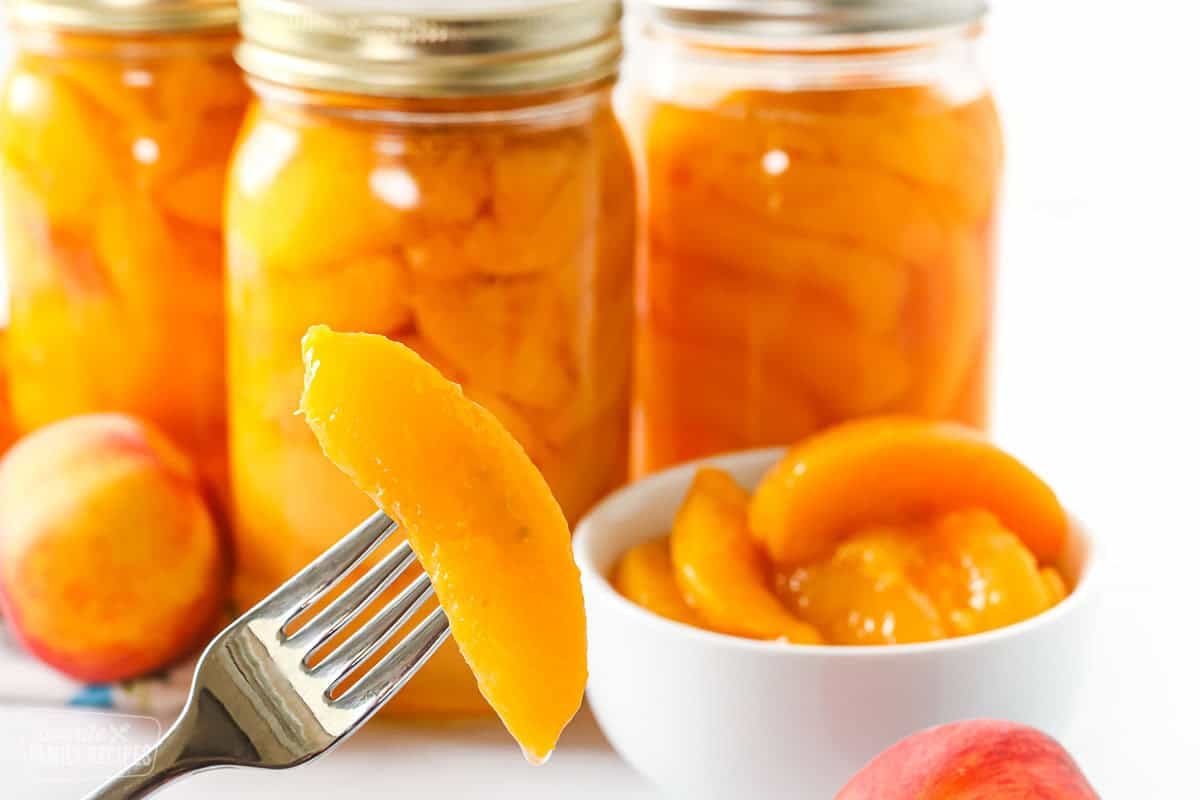
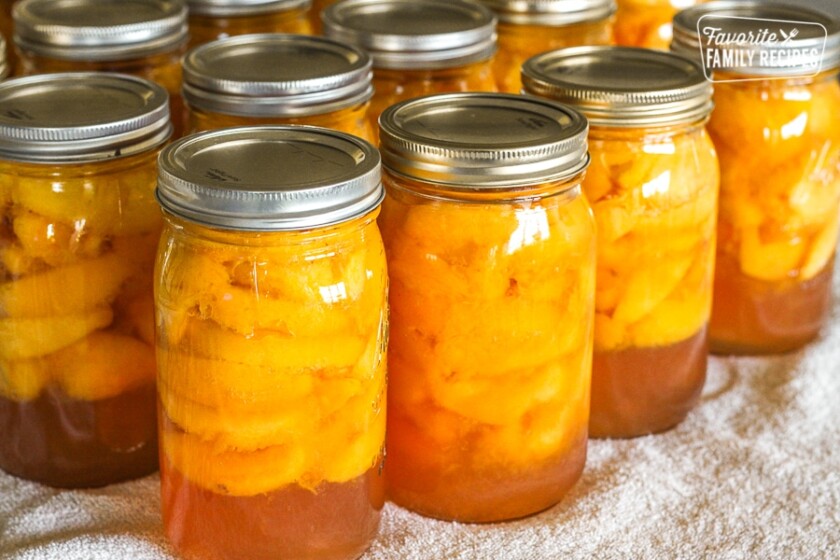
There’s nothing I love more than popping open a jar of home-canned peaches in the middle of winter. It’s like opening a little bottle of sunshine. Sweet, juicy, and just as fresh as the day they were picked. Canning peaches is absolutely worth the effort and it’s easier than you may think. Don’t be intimidated, you can do it! I’ll walk you through it step-by-step so you can enjoy that fresh-picked flavor all year long.
If you’re a beginner in canning peaches and home food preservation, this post provides everything you need to know to have success. However if you want to dive more into canning, be sure to check out our Canning 101 guide as well as our guide to Water Bath Canning.
Want to try more canning recipes? Check out my guides on How to Can Pears, How to Can Whole Tomatoes, and How to Can Diced Tomatoes for more easy and delicious way to preserve your harvest. Don’t forget to try our famous Homemade Canned Spaghetti Sauce recipe (with over 2,000 5-star ⭐️ reviews!)
🩷 Echo
Table of Contents
- Supplies and Ingredients Needed for Canning Peaches
- What are the Best Peaches for Canning?
- Canning Peaches in Light Syrup (Preferred Method)
- For a Heavy Syrup
- Want to Skip the Sugar Altogether?
- Sterilizing the Canning Jars
- Raw Packing vs Hot Packing Peaches
- How Long to Process Peaches for Canning
- Tips For Canning Peaches
- Questions About Canned Peaches
- Recipes Using These Canned Peaches
- Canning Peaches at Home Recipe
Supplies and Ingredients Needed for Canning Peaches
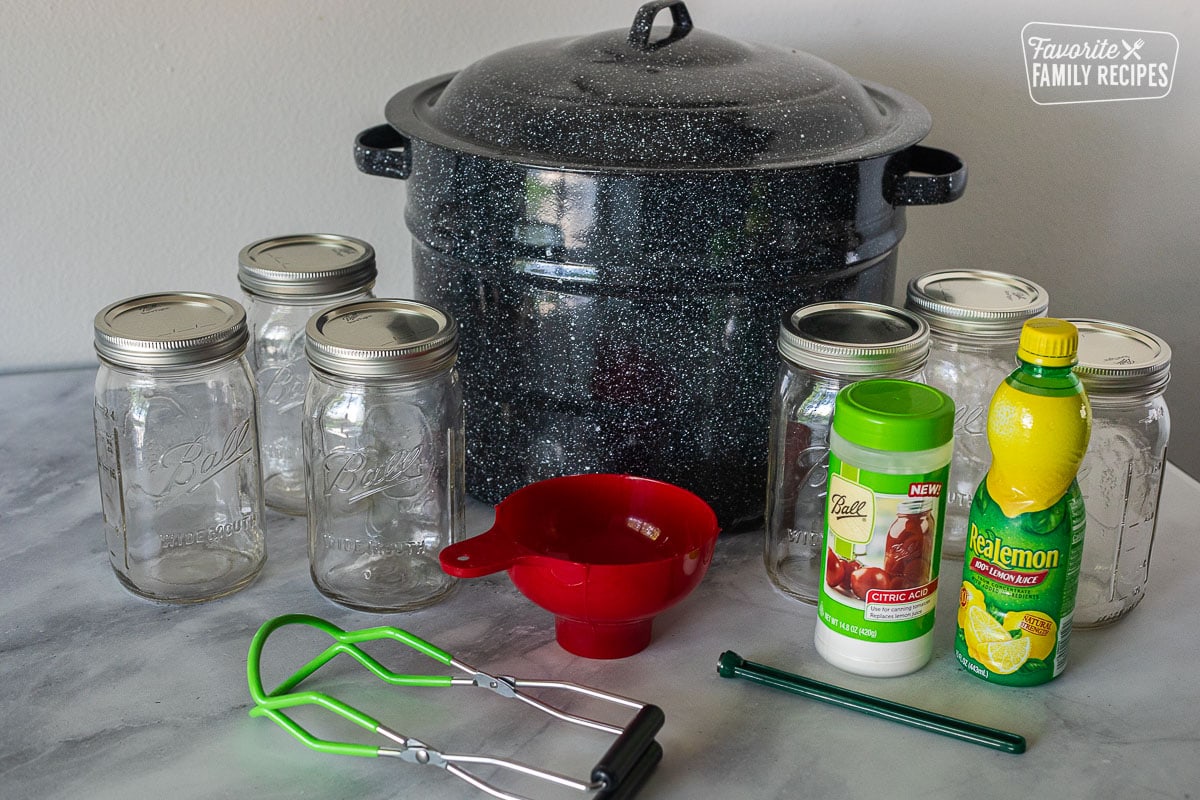
Water bath canning supplies – this includes a water bath canner, jars, lids, and rings. You will also want a few tools to make your life easier when canning including a funnel, jar lifter, and lid wand. Check out our post on Water Bath Canning for a full list of helpful supplies.
Peaches – We like to use ripe, yellow, freestone peaches (more on this below).
Fruit Fresh & lemon juice – these ingredients are both used to keep the peaches from browning and also help with the preservation of the peaches.
Syrup ingredients – This is is simply water and sugar. The ratios can vary depending on how thick of a syrup you want (more on this below).
What are the Best Peaches for Canning?
 for canning peaches at home.")
I like to use the Elberta peaches that come on around September. They are a freestone variety and are easy to work with. Free-stone peaches slip right away from the pit, or stone. Clingstone peaches need to be cut away from the pit, which isn’t a problem either, it just takes a little more work. This recipe works with any traditional yellow varieties of peaches. Do not use white-flesh peaches with this canning method. According to the National Center for Home Food Preservation, white peaches are lower in acid than yellow peaches and are not safe to can as-is.
The most important thing is to use ripe peaches. If the peach is hard and greenish in color, wait a day or two to do your canning. I often can the ripe ones the first day and wait a day or two to can the rest when they have ripened.
Canning Peaches in Light Syrup (Preferred Method)
 for canning peaches at home.")
A light sugar syrup is really the best for canning peaches. Too much sugar can overpower the fresh flavor of the peaches. For my recipe, I use a 2:1 water to sugar ratio. I also use Fruit-Fresh, which contains citric acid, to keep my peaches looking bright and to prevent browning. I use 1 teaspoon of Fruit-Fresh per cup of syrup.
For a Heavy Syrup
For a heavy syrup you can use a 3:2 water to sugar sugar ratio (40% sugar) or if you want a really heavy syrup you can do a 1:1 ratio (50% sugar). I would only do a heavy syrup like this if the peaches were underripe or if I was intending on using the peaches as a topping over ice cream or serving as a dessert with cream.
Want to Skip the Sugar Altogether?
You can can peaches in plain water, fruit juice (like white grape or apple juice), or use a sugar substitute that’s safe for canning. Just keep in mind that peaches canned without sugar may lose a bit of color and flavor over time, but they’re still perfectly safe and delicious.
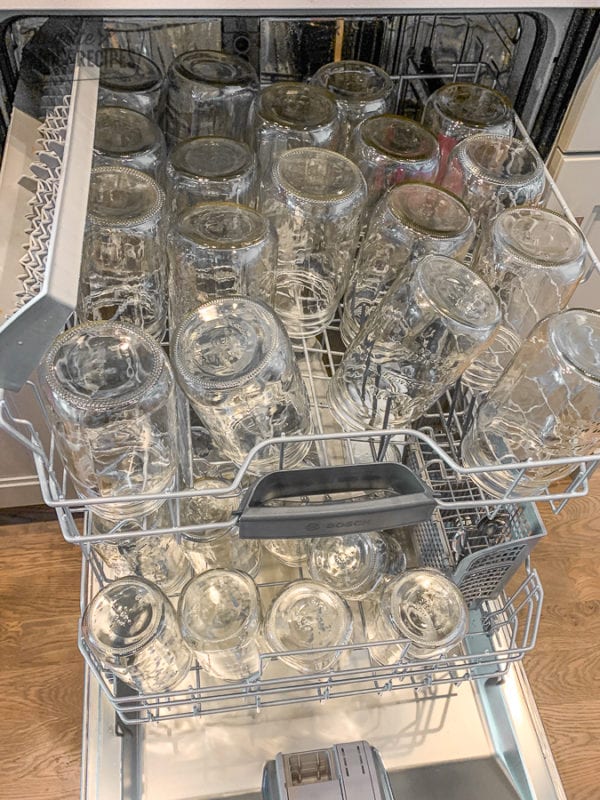
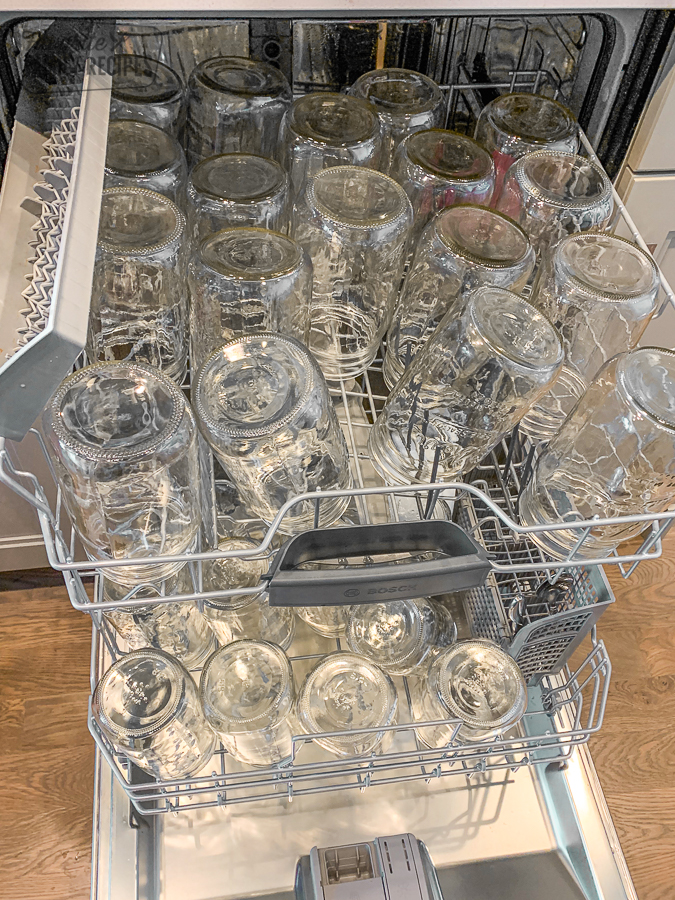
Sterilizing the Canning Jars
The best and easiest way I have found to sterilize my glass bottles for canning is to run them through a normal dishwasher cycle. I place the canning jar lids in a pot of warm water and simmer them until I’m ready to use them.
Raw Packing vs Hot Packing Peaches
This recipe uses the raw pack method, where peaches are blanched, peeled, sliced, and packed into jars with hot syrup. No need to pre-cook the fruit. Another option is the hot pack method, which involves simmering the peaches for about 5 minutes before canning. We prefer raw pack because it’s quicker, easier, and you don’t have to handle hot peaches!
How Long to Process Peaches for Canning
Start your processing time based on your elevation as soon as the water comes to a rolling boil. Here are the correct processing times according to the National Center of Home Food Preservation:
0-1,000 feet = 25 minutes
1,001-3,000 feet = 30 minutes
3,001-6,000 feet = 35 minutes
6,000+ feet = 40 minutes
Tips For Canning Peaches
- To prevent browning, toss your peeled, sliced peaches with Fruit Fresh or a lemon juice mixture before canning (see how in recipe below).
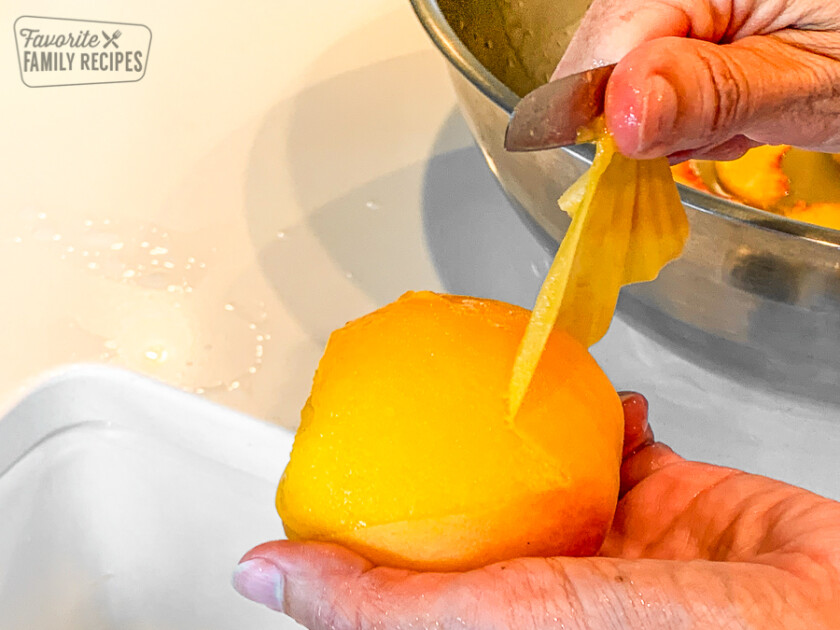
- Blanch your peaches to easily peel peaches. Use a knife to easily pull the peels away from the fruit.
- Halved peaches take up more space in the jars than sliced. If you are planning on halving your peaches you may need to use more jars.
Questions About Canned Peaches
No, peaches don’t need to be pressure canned. They can be safely preserved using the water bath or steam canning methods. However, if you prefer pressure canning, yellow peaches can generally be processed at 6 pounds of pressure for 10 minutes below 2,000 feet. Always check your canner’s manual for the correct time and pressure based on your altitude.
The USDA states that home canned goods last for 1 year. High acid fruit lasts longer, but to be safe, it is best to enjoy within 1 year.
If your peaches aren’t packed tightly enough, they may float to the top of the jar. Don’t worry, this does not affect the taste or the shelf life of the peaches. It may not look as pretty but your peaches are totally fine.
Browning in canned peaches is usually harmless and can be caused by oxidation, contact with copper or iron, or not heating the fruit enough to stop enzyme activity. The peaches may not look perfect, but they’re still safe to eat. However, if they smell sour, fermented, cheesy, or alcoholic, they’ve spoiled and should be discarded.
More Home Canning Recipes: How to Make and Can Homemade Tomato Juice, Virginia Chunk Sweet Pickles, Savory Canned Salsa, and Classic Canned Salsa.
Recipes Using These Canned Peaches
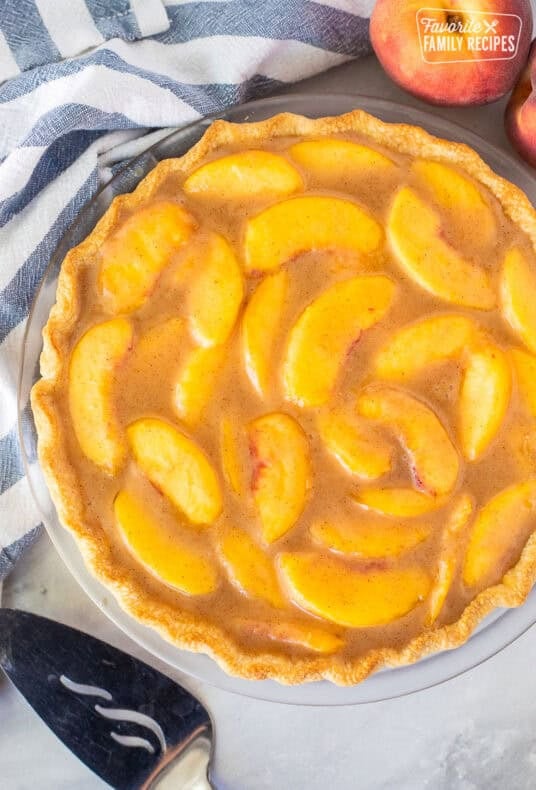

- Peach Galette – This Peach Galette is a warm, rustic dessert that is so simple to make. You will love the flaky crust and the sweet filling.
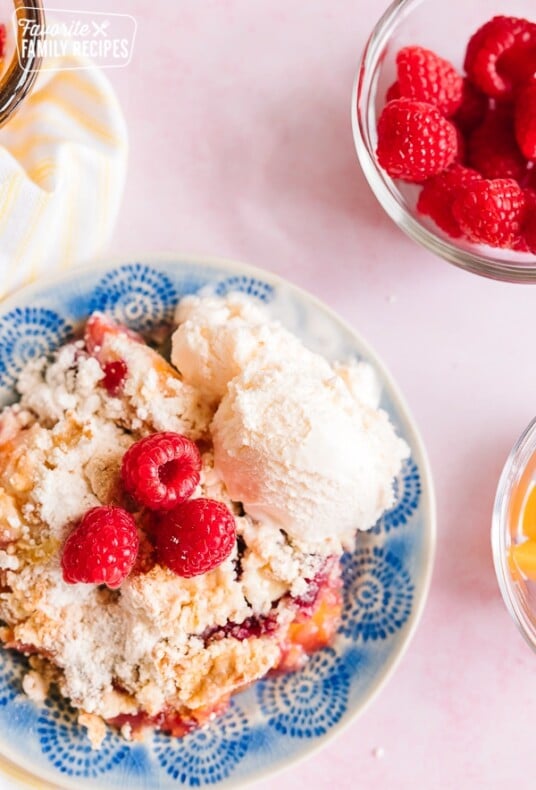
- Peach Freezer Jam – this peach jam has fresh raspberries in the mix and is so tasty!
- Fruit Salsa – this is a fresh mix of peaches, apples , bananas, and berries. Served with cinnamon chips.
Did you can these peaches? I’d love to hear what you think! Did you make a delicious recipe with them? Did you enjoy them straight out of the jar? Drop a comment below and let me know how you liked them. And don’t forget to take a pic and tag us on Instagram @favoritefamilyrecipes! 📸🍑🫙
Canning Peaches at Home
Video
Ingredients
- 30 ripe peaches, (large)
- 1/2 cup lemon juice
- 12 cups water
- 6 cups sugar
- 1/4 cup Fruit-Fresh
Instructions
Prepare for Canning
- Sterilize canning jars by running them through a cycle in the dishwasher.
- Place the canning lids in a large saucepan of hot water and simmer until ready to use.
- Prepare a large pot of water and bring it to a boil on the stove.
- Fill the sink with cold water, or prepare a large bowl of ice water.
- In another large pot, combine the 12 cups of water and 6 cups of sugar. Stir to dissolve the sugar and bring to a boil. Remove from heat. Add ¼ cup Fruit-Fresh and set aside for later.
Prepare the Peaches
- Carefully place several peaches in the large pot of boiling water. All peaches should be totally covered by water.
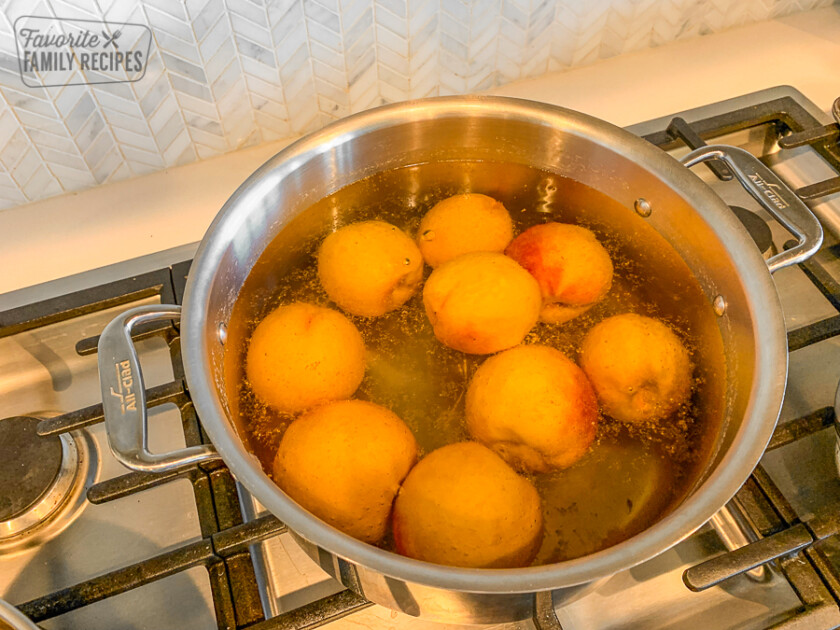
- Set a timer for one minute. Remove the peaches from the boiling water and place them in the sink filled with cold water, or in an ice water bath. Repeat this process until all the peaches are in the cold water.
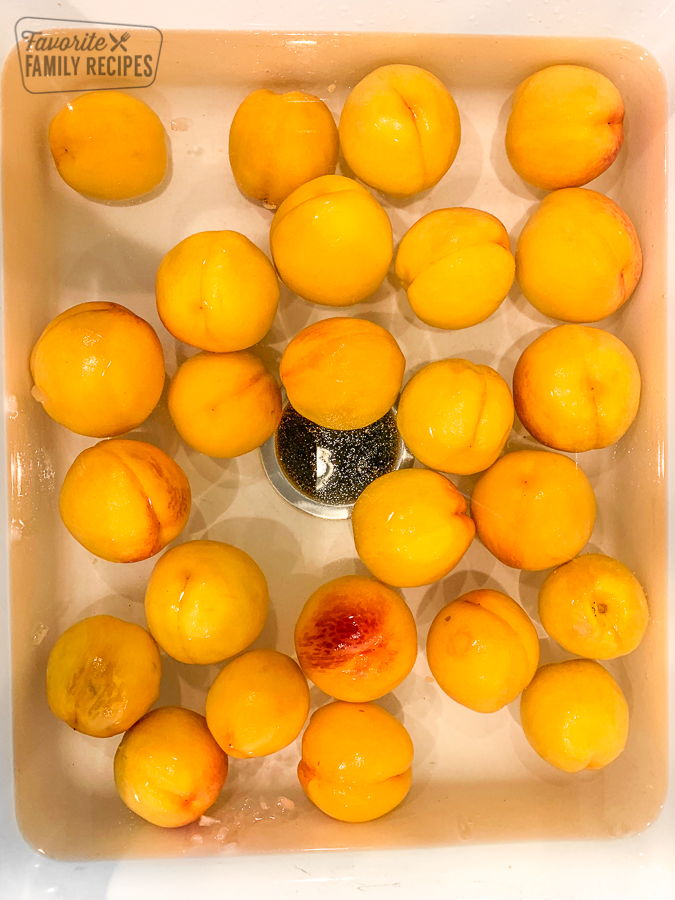
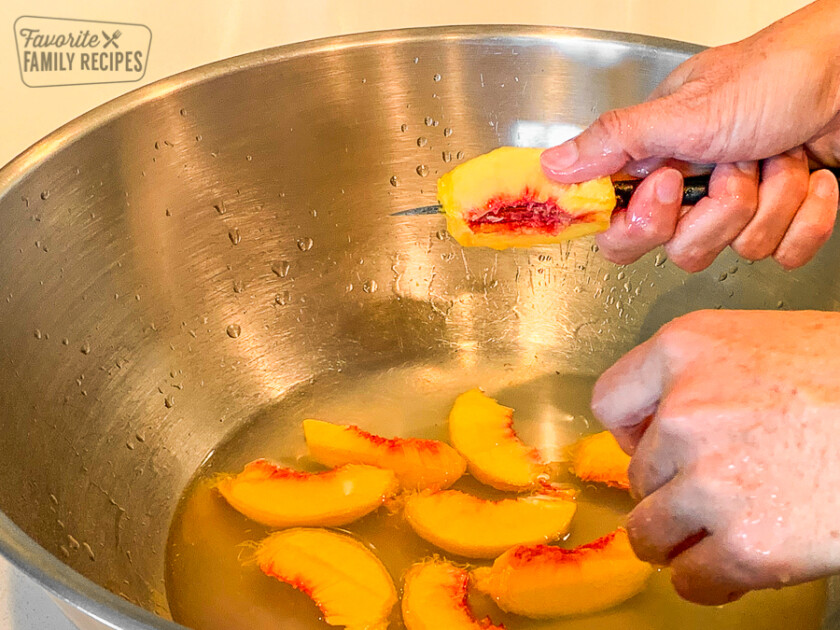
- Add 1 quart of cold water and ½ cup of lemon juice to a large bowl. At this point, peeling the peaches should be easy. The peach skins should slide off without even using a knife. If the a peach is less ripe, it may require a little peeling. Cut the peaches in half or slice them and remove the pits.
- Place the halved or sliced peaches in the large bowl filled with water and lemon juice. Stir the peaches into the water and lemon juice as you slice them to avoid discoloration.
Canning the Peaches
- Place the sterilized jars right side up on a large cookie sheet. This helps keep spills to a minimum. Note: If using white peaches, add 1 teaspoon of additional lemon juice to each jar to help balance out the acidity.
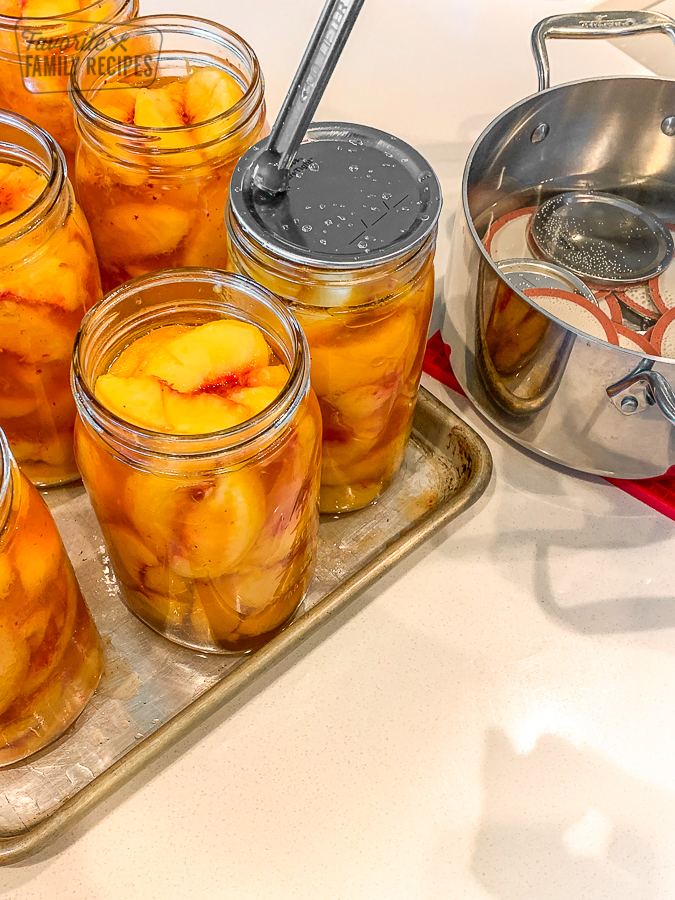
- Pour 1 cup of the light syrup into each jar. Fill each jar with the halved or sliced peaches. Use a slotted spoon or ladle to remove peaches from the bowl of lemon water. Leave ½ inch headspace at the top of each jar.
- Add more syrup to fill the empty spaces between the peaches and to cover the fruit. There should still be ½ inch unfilled space at the top of each jar. You will likely have some light syrup left over after filling the jars.
- It's important to get all of the trapped air bubbles out of the jar before it seals. Slide a clean knife down the inside of the jar in four or five places to release the bubbles. Clean any liquid from the rims of the jars with a clean towel before placing the heated lids on the jars.
- Use a magnetic lid wand or fork to carefully remove a canning lid from the simmering water on the stove. Do not dry it or touch the lid with your bare hands. It will be hot and you don't want to contaminate it. Place it directly on the top of the jar as pictured. Tighten the screw bands firmly on each jar.
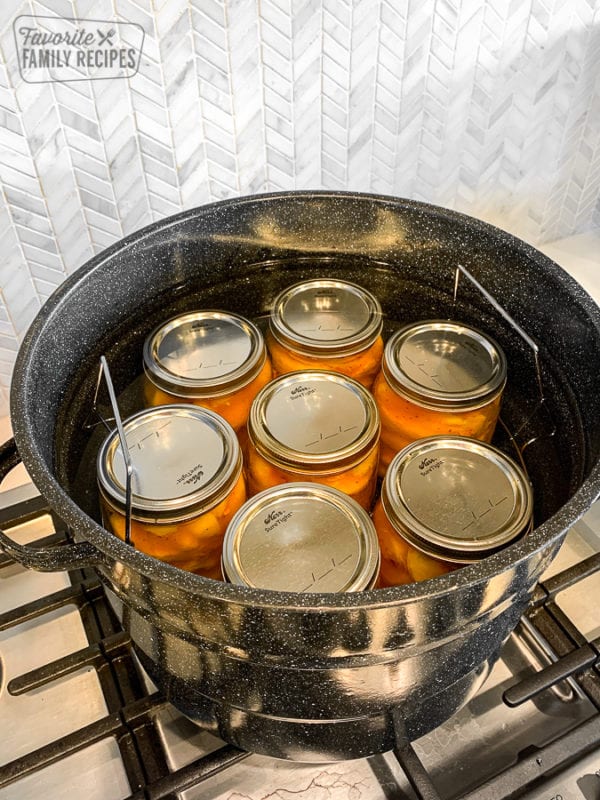
Processing the Peaches
- Fill a water bath canner ½ full with warm water. Place the jars on the wire rack and lower the jars into the canner. Add more water to cover the jars with 1 inch of water above the jars.
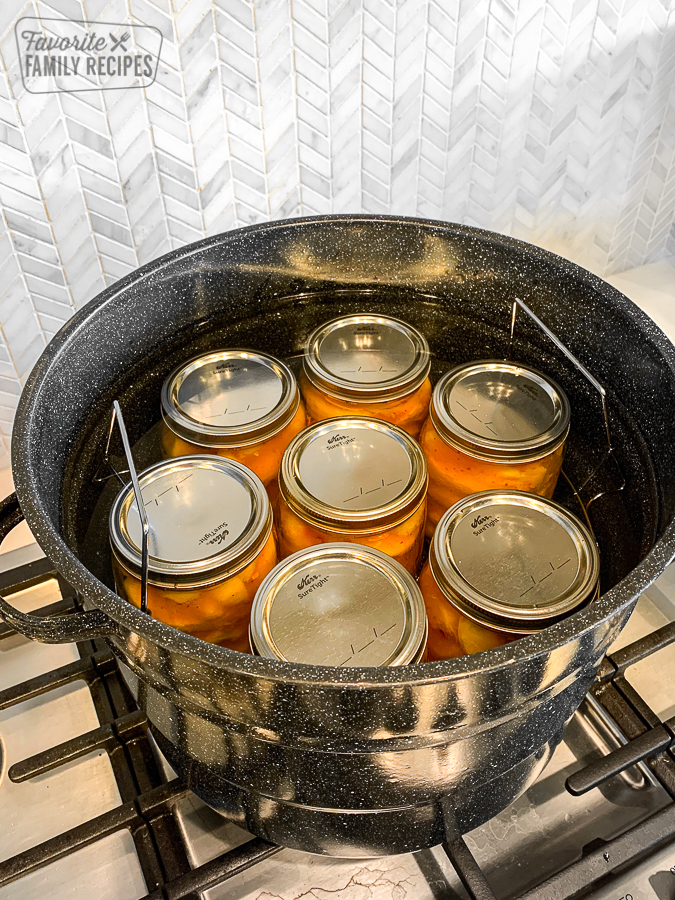
- Cover with a lid, and watch for it to boil. Once it reaches the boiling point, reduce to a medium to medium-high heat. The water should still be boiling, but not at a raging boil that makes a sauna in your kitchen and a mess on the stove. Process quart jars for the following times and elevations: 0-1,000 feet = 25 min, 1,001-3,000 feet = 30 min, 3,001-6,000 feet = 35 min, 6,000+ feet = 40 min.
- When the time is up, remove the jars from the boiling-water canner and let them cool on a counter in a non-drafty area.
- Once jars have cooled, make sure they have sealed properly and store them in a cool, dark place.
Equipment
- 6 Sterilized Glass Quart Canning Jars and Lids (wide-mouth jars are easiest to use)
- Water Bath Canner
- Magnetic Lid Wand or Fork
Notes
Processing Times:
- 0-1,000 feet = 25 minutes
- 1,001-3,000 feet = 30 minutes
- 3,001-6,000 feet = 35 minutes
- 6,000+ feet = 40 minutes
Recipe Tips:
-
- To prevent browning, toss your peeled, sliced peaches with Fruit Fresh or a lemon juice mixture before canning (see how in recipe above)
- Blanch your peaches to easily remove the peels. Use a knife to easily pull the peels away from the fruit.
-
- Halved peaches take up for space in the jars than sliced. If you are planning on halving your peaches you may need to use more jars.
Nutrition
Nutrition information is automatically calculated, so should only be used as an approximation.
Love this recipe?
We want to hear from you! Please leave a review.
My peaches turned out tasting awesome, but I don’t know if they sealed correctly as They had syrup running out of jars, so don’t know if they are sealed of if lids are stuck on due to the over run. Lots of bubbling in jars when removed from pan. Did I maybe had the heat too high ? They all made the pop sound except for 1, Don’t know what I did wrong, I thought I removed all bubbles prior to bath,
Thanks
Hi Linda- that is actually very common and happens to me all the time. The syrup leaking out and bubbling is likely due to siphoning, which can happen if the heat was too high or jars were removed too quickly from the canner. As long as the lids sealed properly (no flex when the top is pressed, and they hold when gently lifted), they should be safe. If a lid didn’t seal or you’re unsure, pop it in the fridge and enjoy it first!
It’s important to remember that peaches canned with just water are just as you described but they’re not as firm. That is my experience
Annette Bell
Co-owner Bells Orchard
Beaverton, Oregon
very well done instructions
Thank you this recipe is super easy and helped me remember how to do it and now I can share it with my friend that wants to learn
Cool recipe, except for one big problem with how the recipe was written. As someone who is really new to canning, I didn’t know I had to also add lemon juice to the jar until I saw it written in the helpful tips at the END. Aka after I had already spent 8 hours prepping the peaches and sealing the jars. Looks like these will all just have to go in the fridge and be eaten within the next couple weeks. The recipe should have included in the steps that lemon juice needed to be added to the jars. That’s an important step.
If you added the lemon juice when processing the peaches, you don’t need to add it to the cans.
Question, this recipe calls for more peaches then what I have,is there a smaller scale of recipe for l10 whole fresh peaches. Just example.
We usually don’t can smaller amounts because it is a very messy and time consuming process and it doesn’t feel worth it for such a small yield.
Easy and direct. Thank you!
Great recipe, but I think you are five minutes short on the processing time. Per the site you referenced, https://nchfp.uga.edu/how/can_02/peach_sliced.html this is a raw pack method and requires 30 minutes to process quarts of peaches in low altitudes. Thanks!
My wife and I are preparing to can around 20 lbs. of peaches using your recipe. The video shows you adding a small amount of lemon juice to each jar, but the “step-by-step” instructions don’t mention it. How much lemon juice should we use if using quart jars? Thank you!
Add 1 Tablespoon per jar!
I found the recipe to be quite helpful, easy to follow and loved the heads up caution about adding too much sugar to the 12 cups of water. Everything turned out great1
I’m so glad this recipe was helpful to you. . We can peaches with this recipe at the end of every summer. They are delicious!
Dishwashers do not sterilize, they only sanitize,. There is no need to sterilize any product that will be processed for longer than 10 minutes. It is the processing which sterilizes, if done properly.
I like this recipe and instructions better than any I’ve looked at and tried. Thank you for sharing your recipe.
Thank you, Tanya. We’ve been canning peaches this way for years. I’m happy it is helpful to you!
Thank you for sharing you methods. I just used this recipe, and found it to be a mixed bag.
Some of the instructions were detailed and helpful, like the poaching of the fruit. Others were a bit convoluted and just confusing. Like the 12 cups of water and 6 cups of sugar for the syrup. Did I miss a step? Should this have been boiled down or cut back? I ended up throwing over half of it away, since it equated to over 1-1/2 cups of liquid per pint jar. Also, the recipe doesn’t indicate how to be certain that the process was successful. Since this is designed for beginners, they should know how to test the cap to ensure that the processing worked.
In the recipe (step 5) it reads to boil the sugar and water together until it dissolves. You may not need all of it, it depends on how tightly you pack your peaches. You can cut back on the amounts next time if you need to. We will try and include more specific instructions on testing the cap to make sure it processes correctly.
The recipe clearly states it’s for quart jars….not pint…🤦🏻♀️
Use less syrup in jar until you have filled with peaches otherwise you only have half a jar of actual fruit
Just can the excess syrup for future use. Same with unused pickle brine.
going to try your recipe, thanks
Thank you for sharing your canning process.
Since you are teaching canning methods to the public,
dishwasher sanitation is NOT the same as sterilization.
To sterilize the jars, they need to be in a hard roll boil ( 220 degrees) for at least 20 min.
And THEN fill jars using a sterile technique.
I know most people confuse sanitation and sterilization, the difference is real. 😉
Happy and safe processing.
Even the USDA says the dishwasher is fine, since the jars are boiled for 30 minutes during processing.
I have been canning peaches for years. After I wash the dishes in the dishwasher, I stand them on a tray in the oven at 200 degrees to keep them warm as I fill each jar. I use a light syrup and I also pressure can them. Love it! Ty.
I can’t WAIT for peach season to do this. They’re my favorite summer fruit hands down and any way I can enjoy them into the depths of winter is a win. Thanks for the in depth instructions!